|
by Pedro Firmino This tutorial is based on the solution developed by professor Angelo Farina for preparing a 360 video with 3rd Order audio (source http://www.angelofarina.it/Ambix+HL.htm). In this adaptation, we will show you how to create a 360 video with 3rd Order Ambisonics audio using:
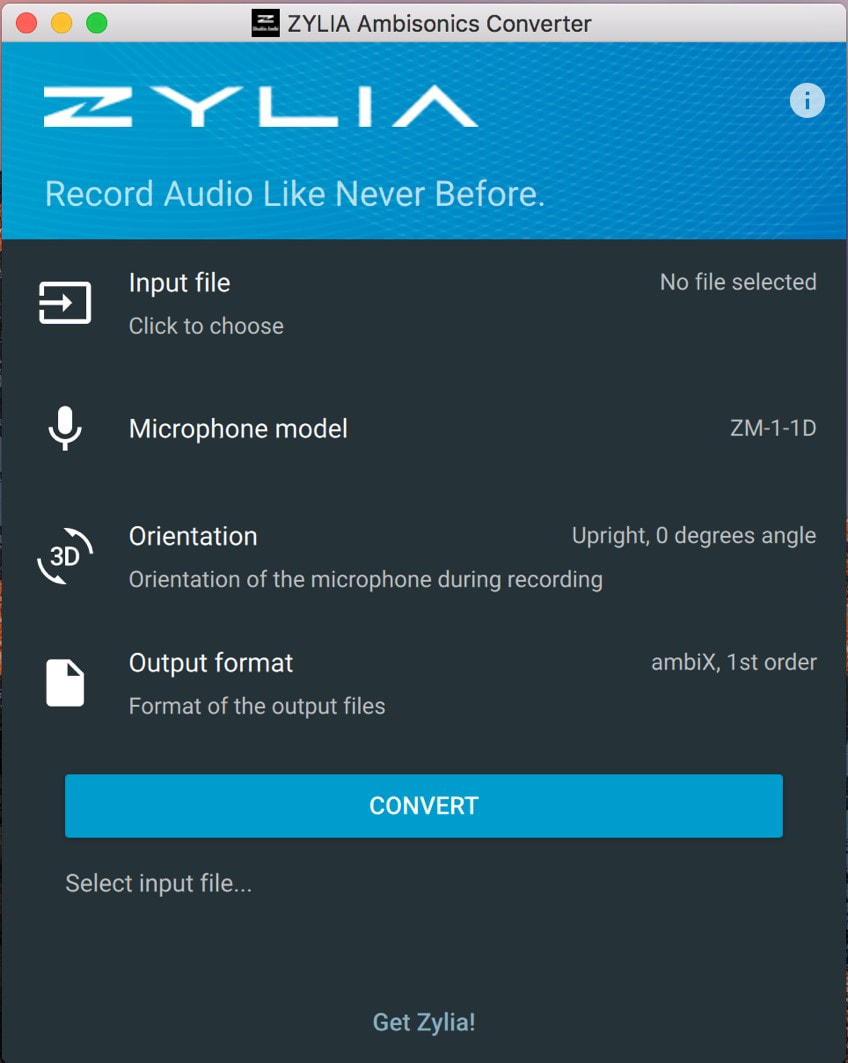
This tutorial consists in 2 parts: A: Preparing the 360 content with 16 channels B: Injecting metadata using Spatial Media Injector version, modified by Angelo Farina. At the moment, only HOAST library ( https://hoast.iem.at/ ) is the only platform which allows online video playback of 3rd Order Ambisonics and therefore the content created from this tutorial is meant to be watched locally using VLC player. For this tutorial, basic Python knowledge is advised. For preparing a 360 video with 1st order Ambisonics, visit the link: https://www.zylia.co/blog/how-to-prepare-a-360-video-with-spatial-audio PART A 1. As usual, start by recording your 360 video with the ZYLIA ZM-1 microphone and remember to have the front of the ZM-1 aligned with the front of the 360 camera. 2. After recording, import the 360 video and the 19 Multichannel audio file into Reaper. Syncronize the audio and video. 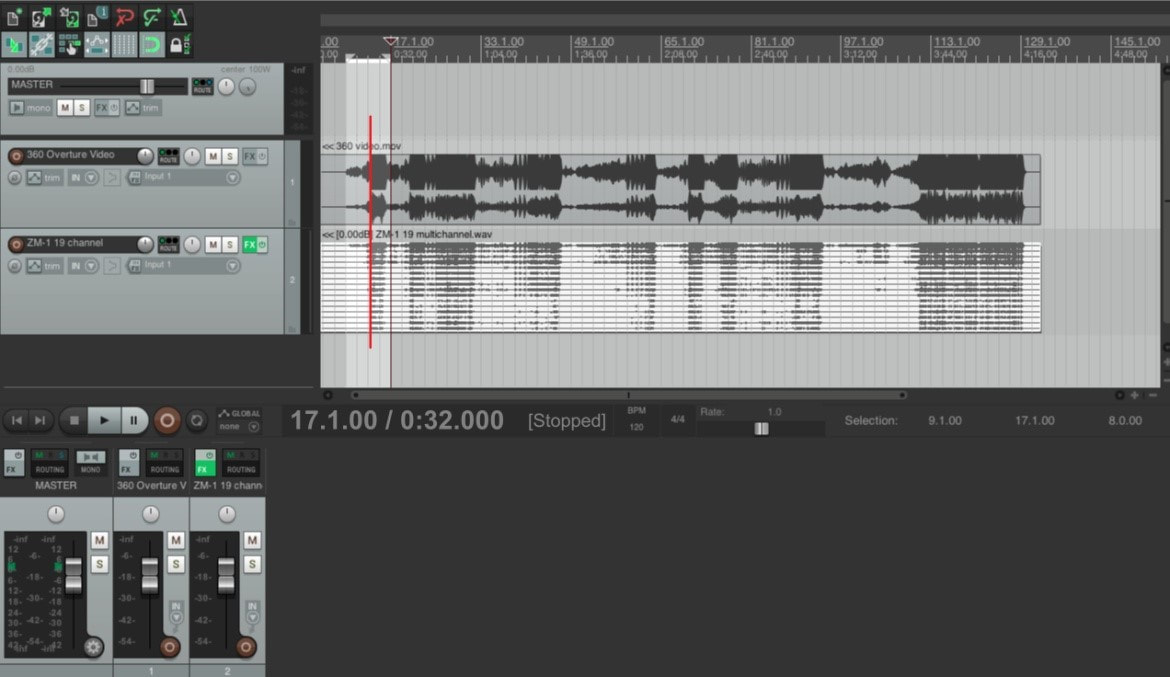 3. On the ZM-1 audio track, insert ZYLIA Ambisonics Converter and select 3rd Order Ambisonics. This will decode your 19 multichannel track into 16 channels (3rd Order Ambisonics). 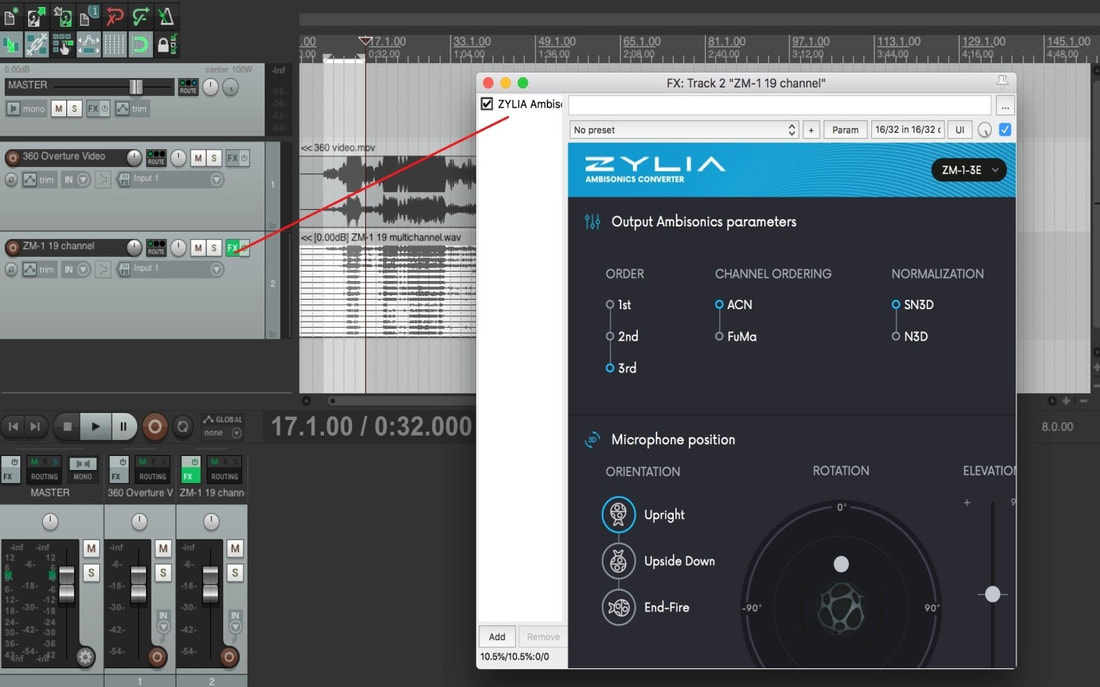 4. On the Master track, click on the Route button, On the track channels, select 16. Now you are receiving the signal from the 16 channels from the audio track. 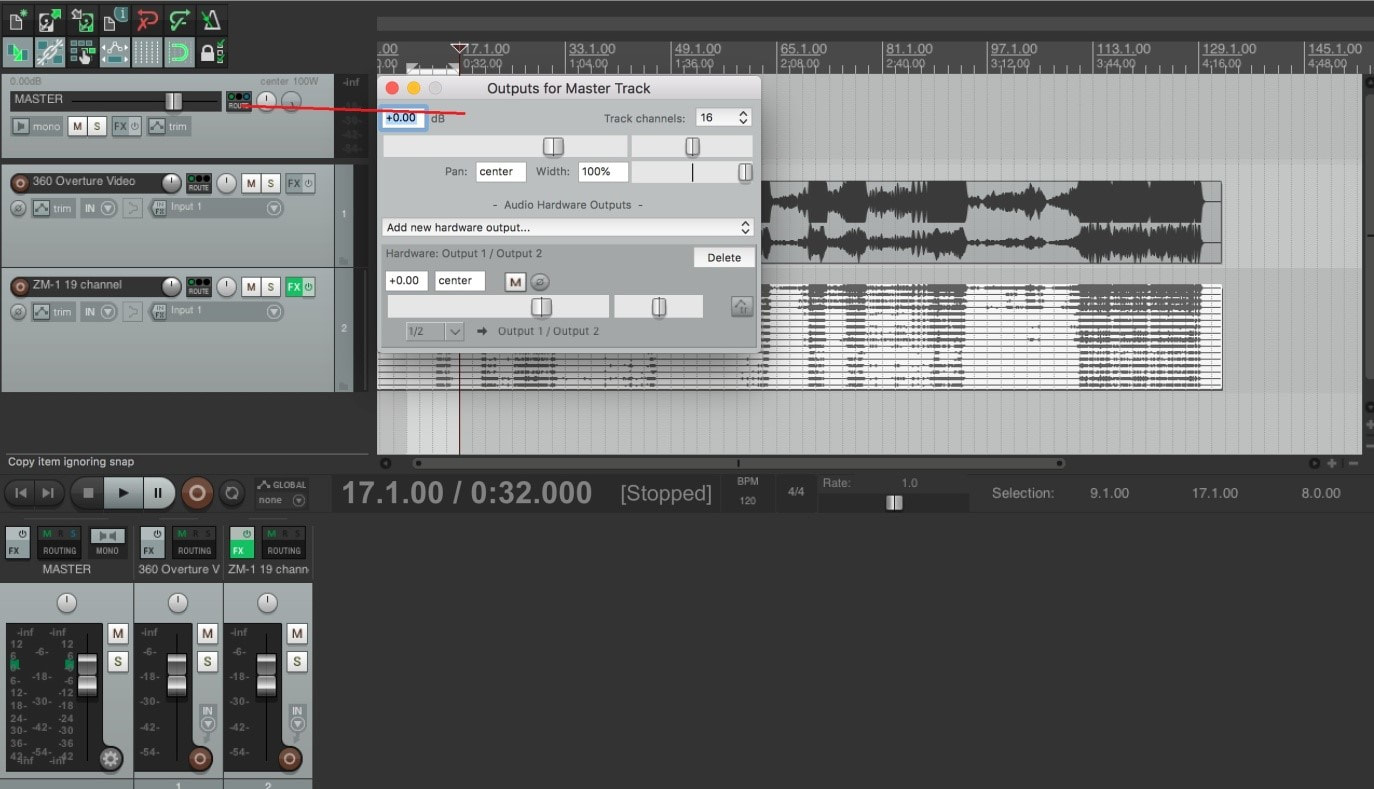 5. Once the video is ready for exporting, click File – Render. As for the settings: Sample rate: 48000 Channels: 16 (click on the space and manually type 16) Output format: Video (ffmpeg/libav encoder) Size: 3840 x 1920 (or Get width/height/framerate from current video item Format: QT/Mov/MP4 Video Codec: H.264 Audio Codec: 24 bit PCM Render the video. 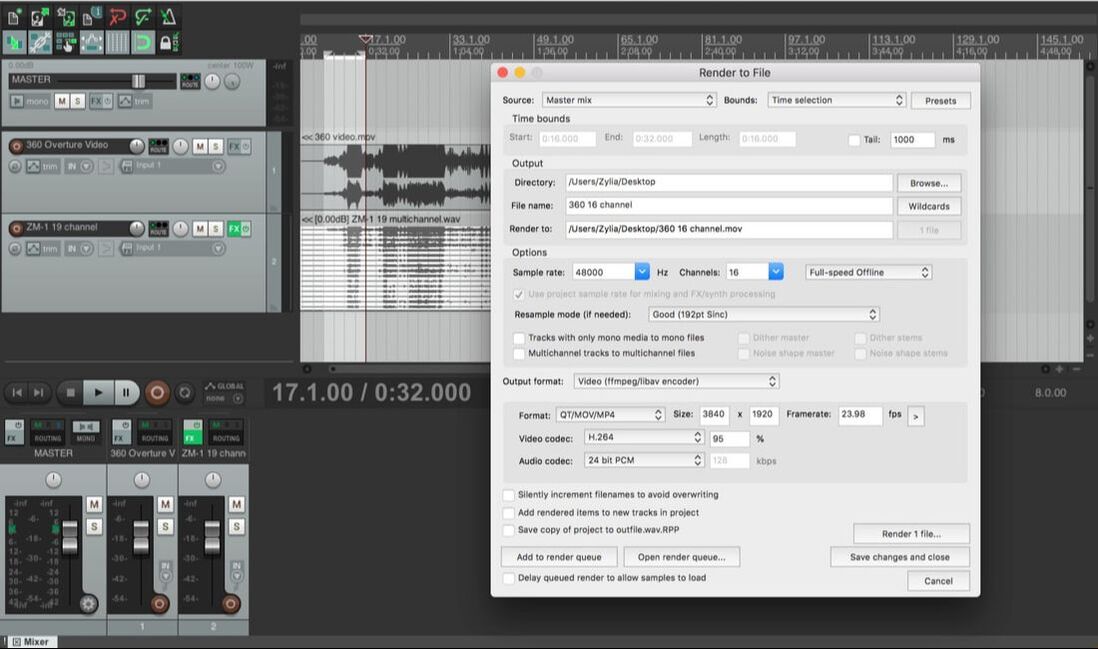 PART B After having the 360 video with 16 channels, it is necessary to inject metadata for Spatial Audio. In order to do this, Python is required. Python is preinstalled in macOS but you can download Python 2.7 version here: https://www.python.org/download/releases/2.7/ Afterward, download Angelo Farina’s modified version of Spatial Media Metadata Injector, located at: http://www.angelofarina.it/Ambix+HL.htm  The next part: 1. With the downloaded file located in your Desktop, run macOS Terminal application. 2. Using “cd” command, go to folder where you have Spatial Media Injector (eg. “cd ~/Desktop/spatial-media-2/”) 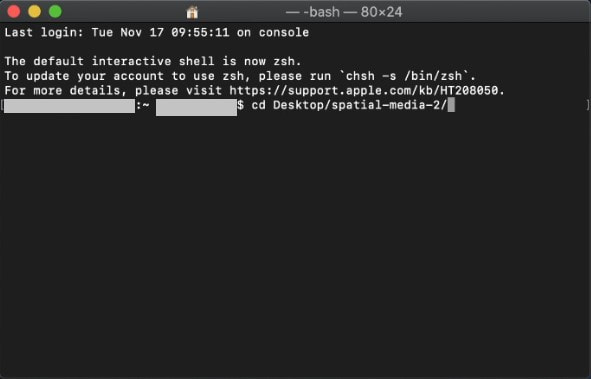 3. Run Python script “sudo python setup.py install”. Type your password. 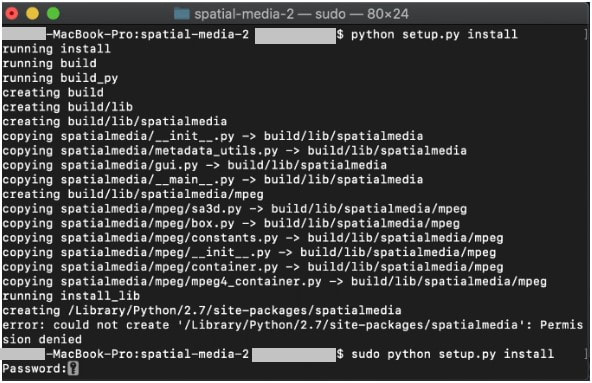 After the build is complete, type command: “cd build/lib/spatialmedia” 6. Enter python gui.py and the application should run. 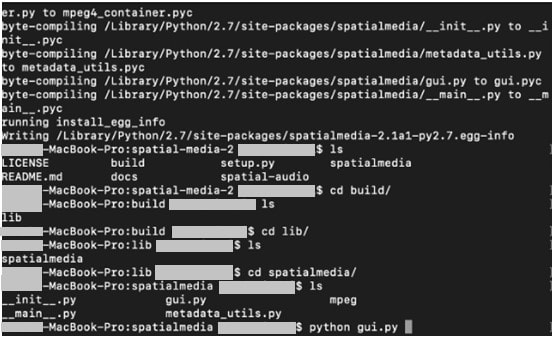 With the Spatial Media Metadata Injector opened, simply open the created 360 video file, and check the boxes for the 360 format and spatial audio. Inject metadata and your video will be ready for playback using 3rd Order Ambisonics audio. 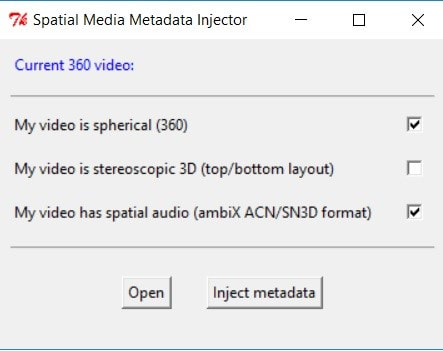
0 Comments
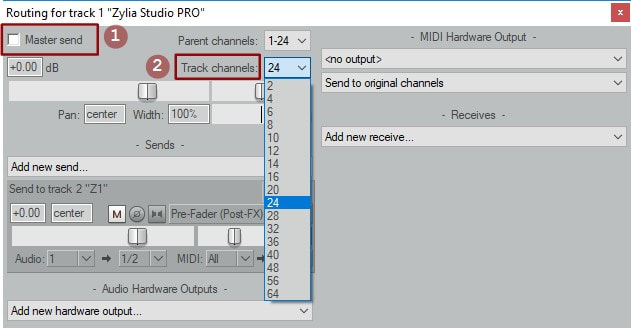
In this tutorial we describe the process of converting 360 video and 3rd order Ambisonics to 2D video with binaural audio with linked rotation parameters. This allows us to prepare a standard 2D video while keeping the focus on the action from the video and audio perspective. It also allows us to control the video and audio rotation in real time using a single controller. Reaper DAW was used to create automated rotation of 360 audio and video. Audio recorded with ZYLIA ZM-1 microphone array. Below you will find our video and text tutorial which demonstrate the setup process. Thank you Red Bull Media House for providing us with the Ambisonics audio and 360 video for this project. Ambisonics audio and 360 video is Copyrighted by Red Bull Media House Chief Innovation Office and Projekt Spielberg, contact: cino (@) redbull.com Created by Zylia Inc. / sp. z o.o. https://www.zylia.co Requirements for this tutorial:
We will use Reaper as a DAW and video editor, as it supports video and multichannel audio from the ZM-1 microphone. Before recording the 360 video with the ZM-1 microphone make sure to have the front of the camera pointing the same direction as the front of the ZM-1 (red dot on the equator represents the front of the ZM-1 microphone) , this is to prevent future problems and to know in which direction to rotate the audio and video. Step 1 - Add your 360 video to a Reaper session. The video file format may be .mov .mp4 .avi or other. From our experience we recommend to work on a compressed version of the video and replace this media file later for rendering (step 14). To open the Video window click on View – VIDEO or press Control + Shift + V to show the video. 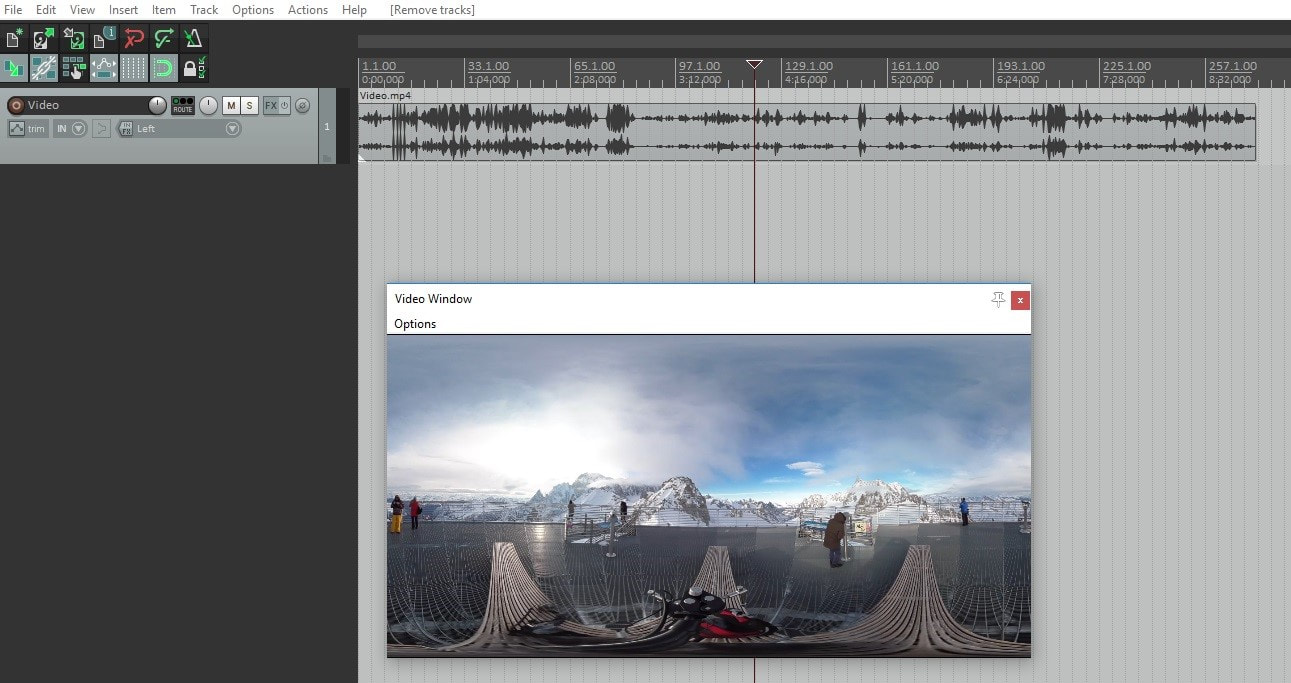 Step 2 - Add the multichannel track recorded with the ZM-1 and sync the Video with the ZM-1 Audio track. Import the 19 channel file from your ZM-1 and sync it with the video file. 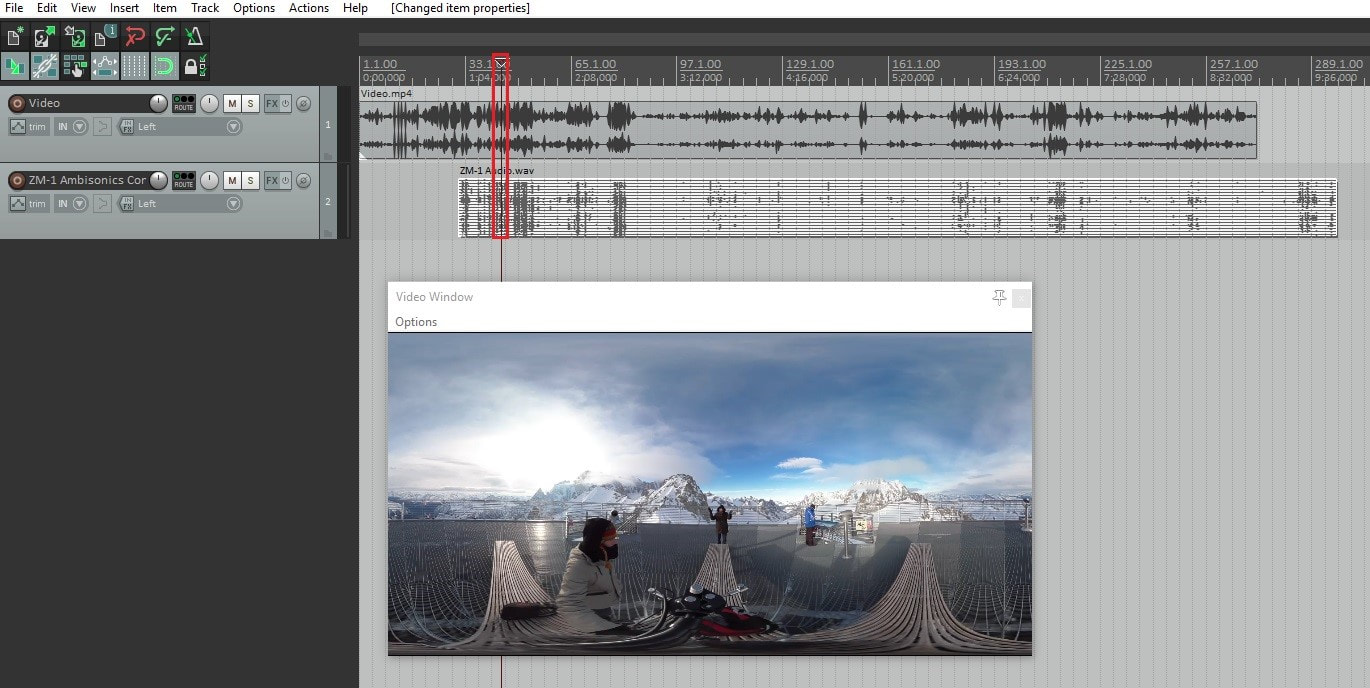 Step 3 – Disable or lower the volume of the Audio track from the video file. Since we will not use the audio from the video track, we require to remove or put the volume from the audio track at minimum value. To do so, right click on the Video track – Item properties – move the volume slider to the minimum. 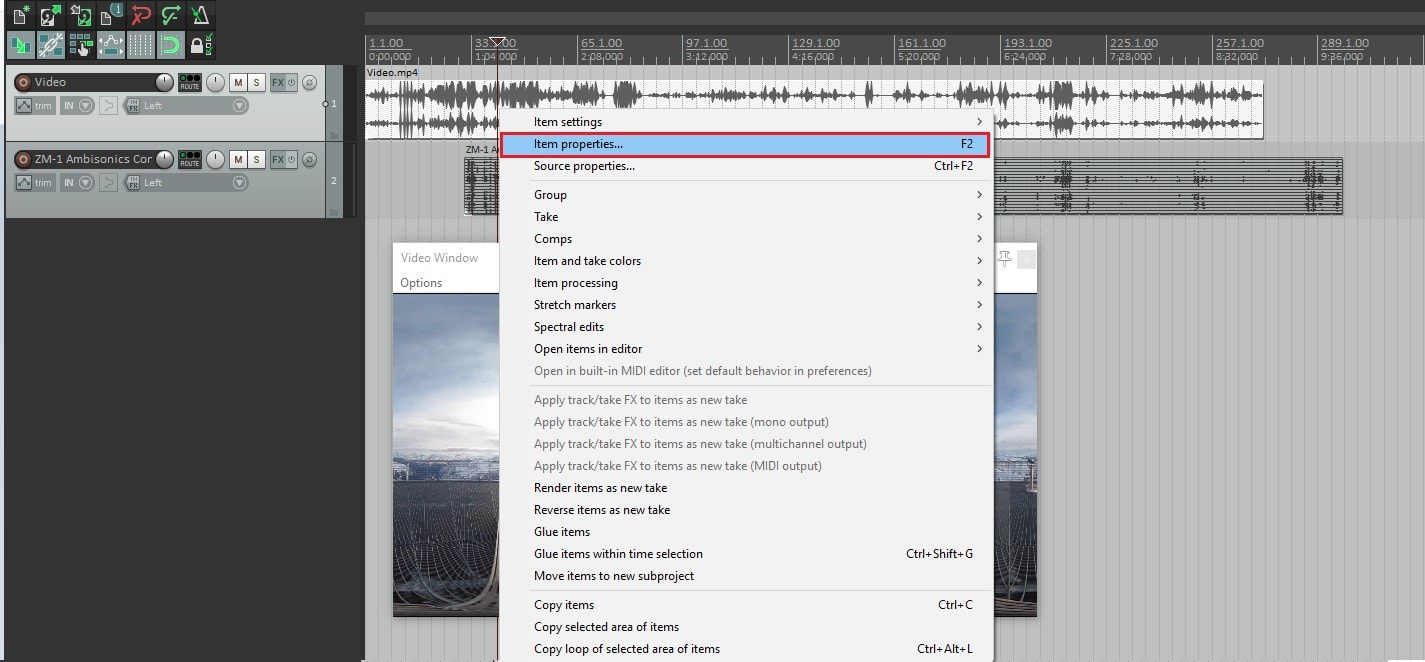 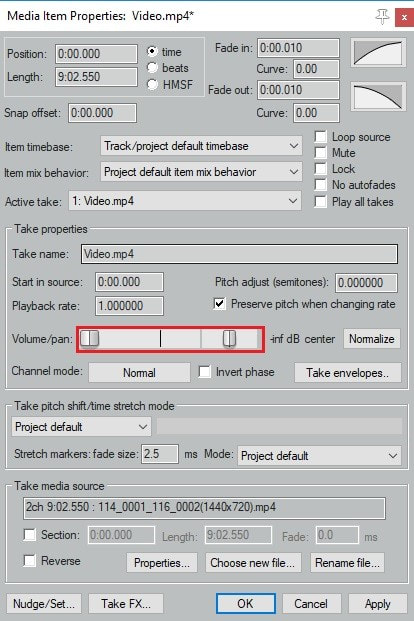 Step 4 – Merge video and audio on the same track. Select both the video and audio track and right click – Take – implode items across tracks into takes This will merge video and audio to the same track but as different takes. 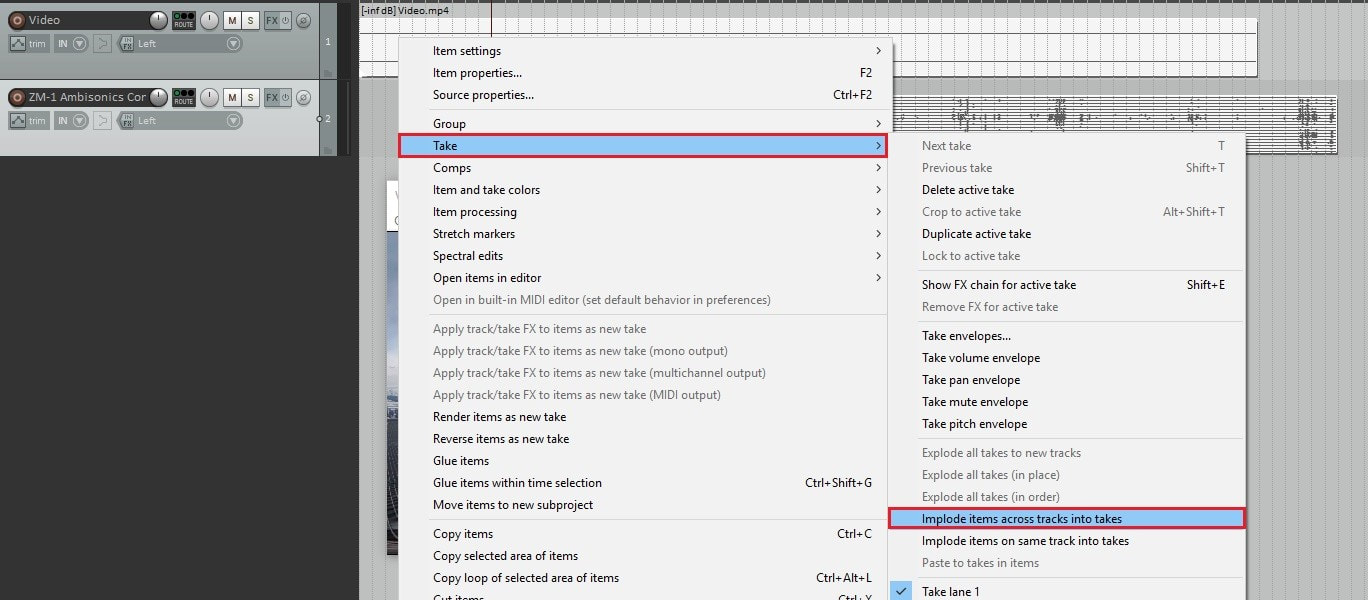 Step 5 – Show both takes. To show both takes, click on Options – Show all takes in lanes (when room) or press Ctrl + L 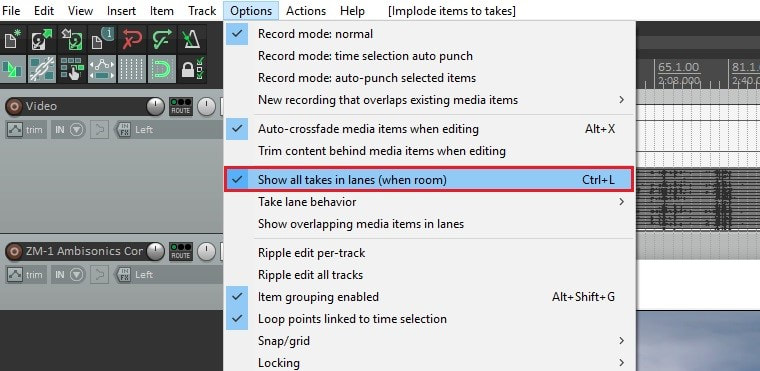 Step 6 – Change the number of channels to 20. Click on the Route button and change the number of track channels from 2 to 20, this is required to utilize the 19 multichannel of the ZM-1. 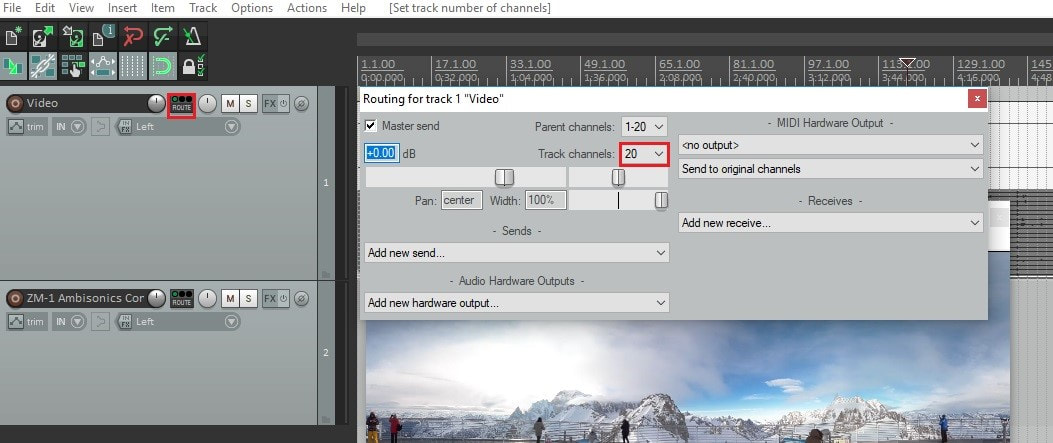 Step 7 - Play both takes simultaneously. If we press play right now, it will only play the selected take, therefore we need to be able to play both takes simultaneously, therefore: Right click on the track – Item settings – Play all takes. 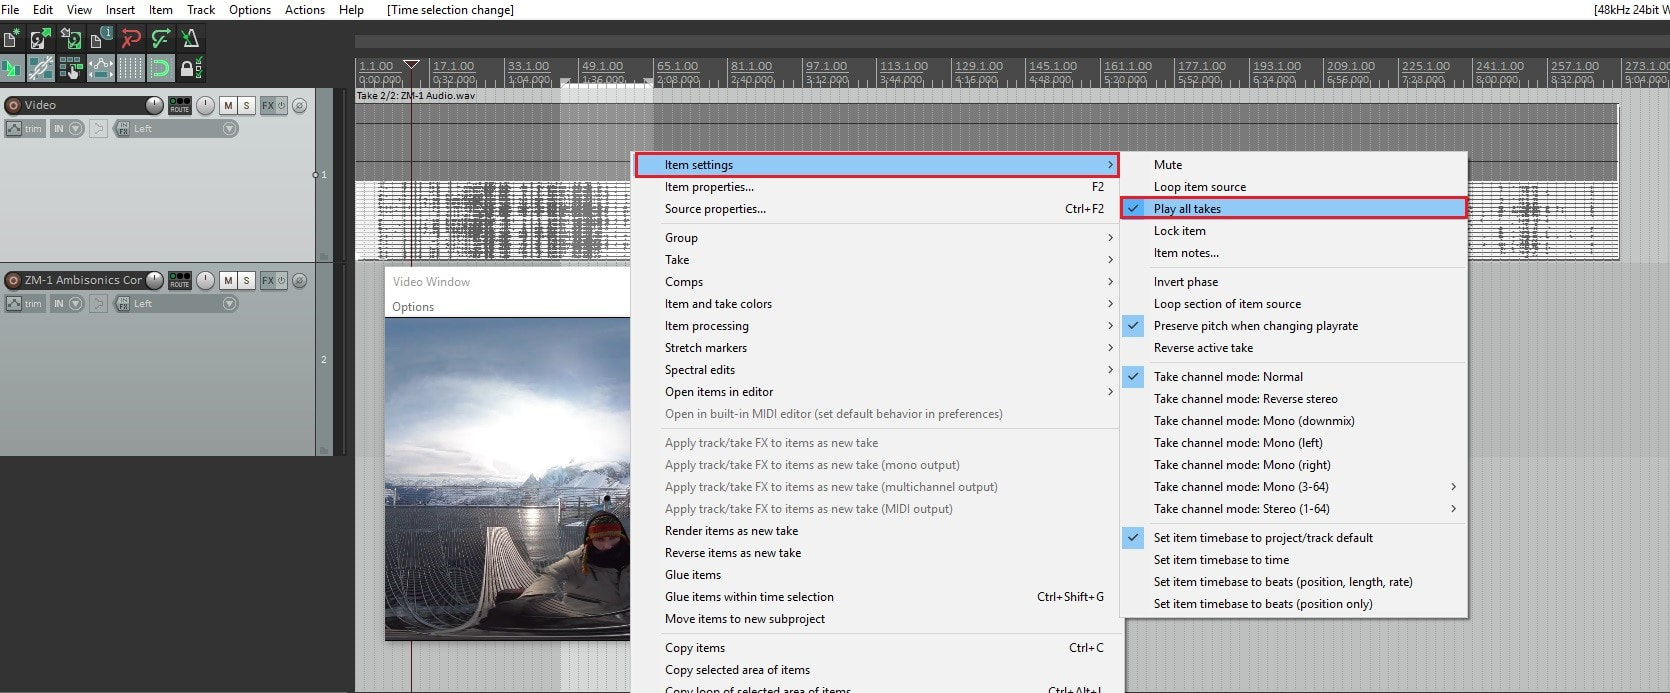 Step 8 – Change 360 video to standard video. Next we will need to convert the 360 video to equirectangular video to visualize and control the rotation of the camera. To do so, open the FX window on our main track and search for Video processor. 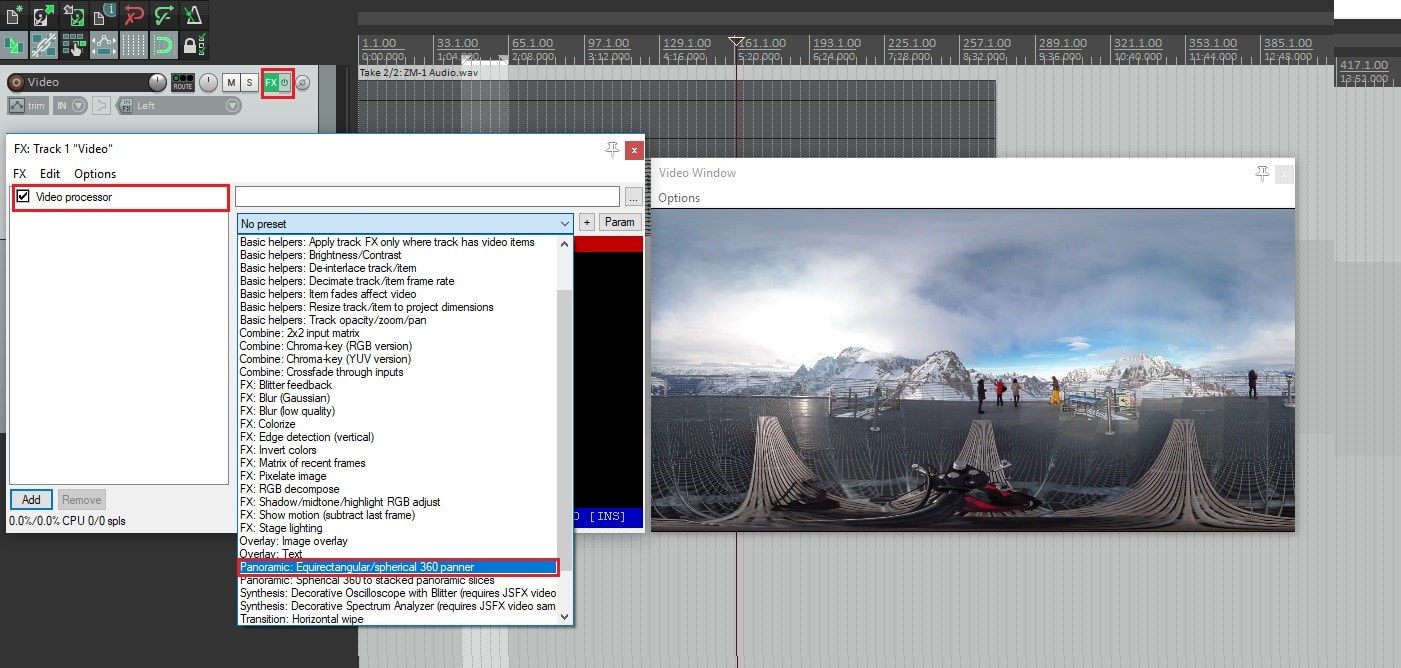 On the preset selection, choose Equirectangular/spherical 360 panner, this will flatten your 360 video allowing you to control the camera parameters such as field of view, yaw, pitch and roll. 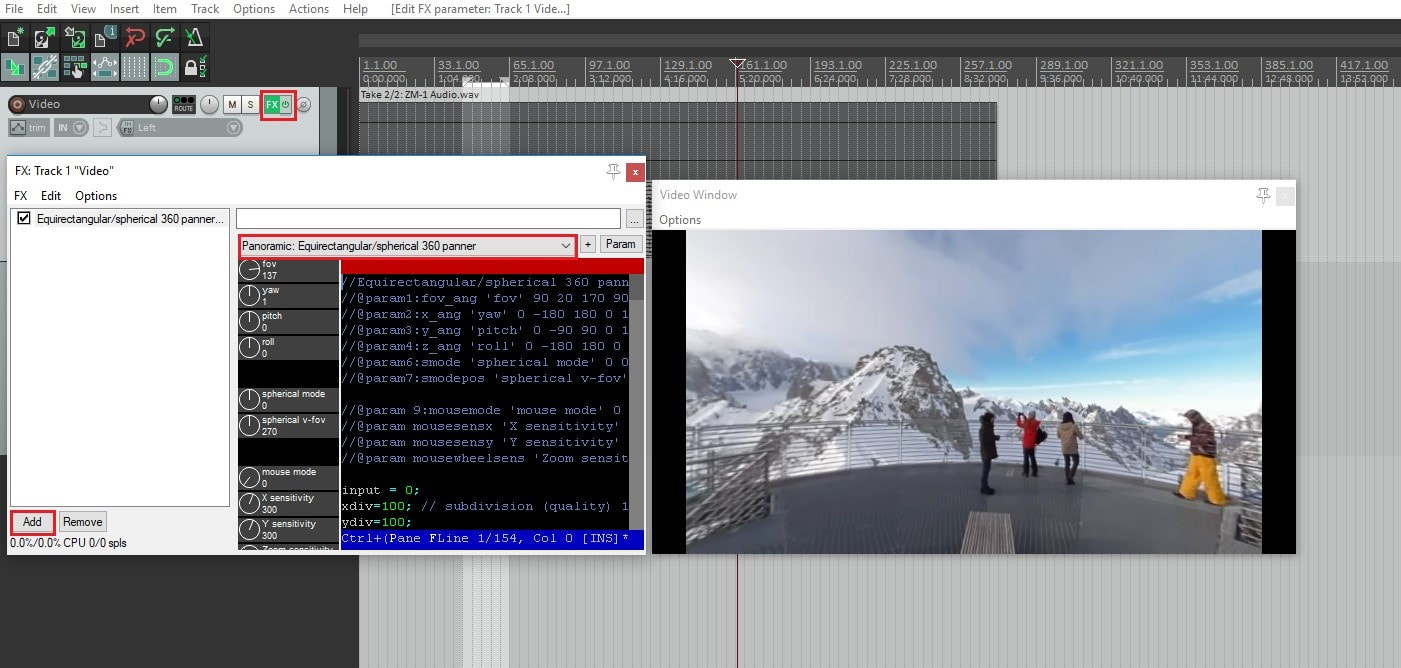 Step 9 – As FX, add ZYLIA Ambisonics Converter plugin and IEM binaural Converter. On the FX window add as well:
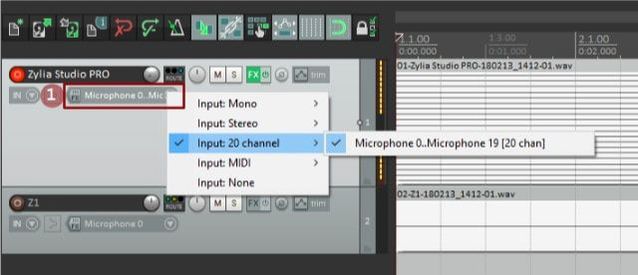
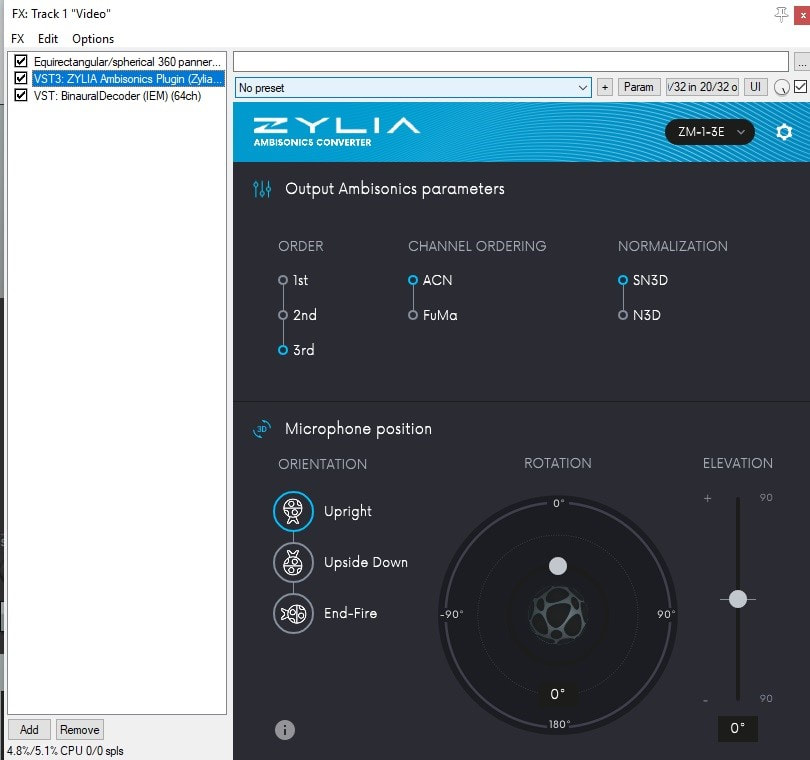 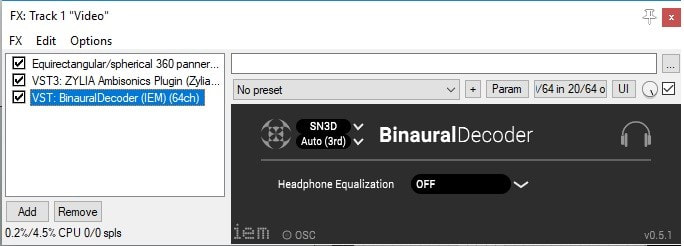 You should now have the binaural audio which you can test by changing the rotation and elevation parameters in ZYLIA Ambisonics Converter plugin. Step 10 – Link the rotation of both audio and video. The next steps will be dedicated to linking the Rotation of the ZYLIA Ambisonics Converter and the YAW parameter from the Video Processor. On the main track, click on the Track Envelopes/Automation button and enable the UI for the YAW (in Equirectangular/spherical 360 panner) and Rotation (in ZYLIA Ambisonics Converter plugin). 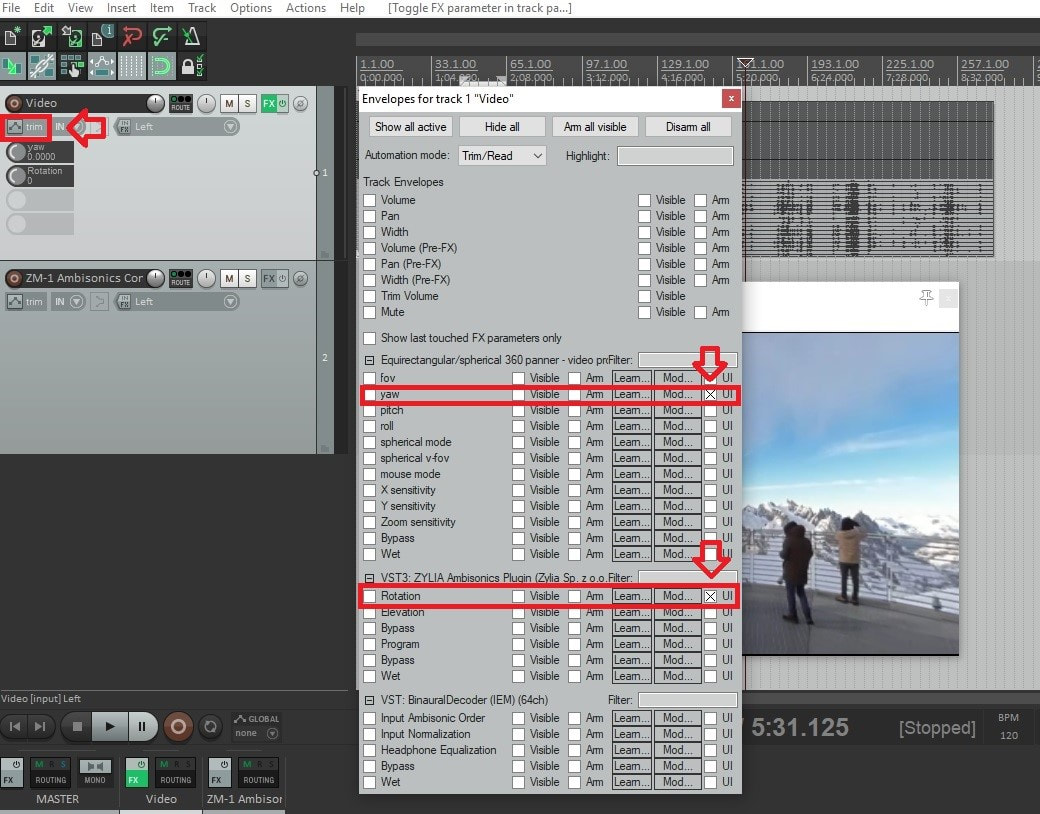 Step 11 – Control Video yaw with the ZYLIA Ambisonics Converter plugin. On the same window, on the YAW parameters click on Mod… (Parameter Modulation/Link for YAW) and check the box Link from MIDI or FX parameter. Select ZYLIA Ambisonics plugin: Rotation 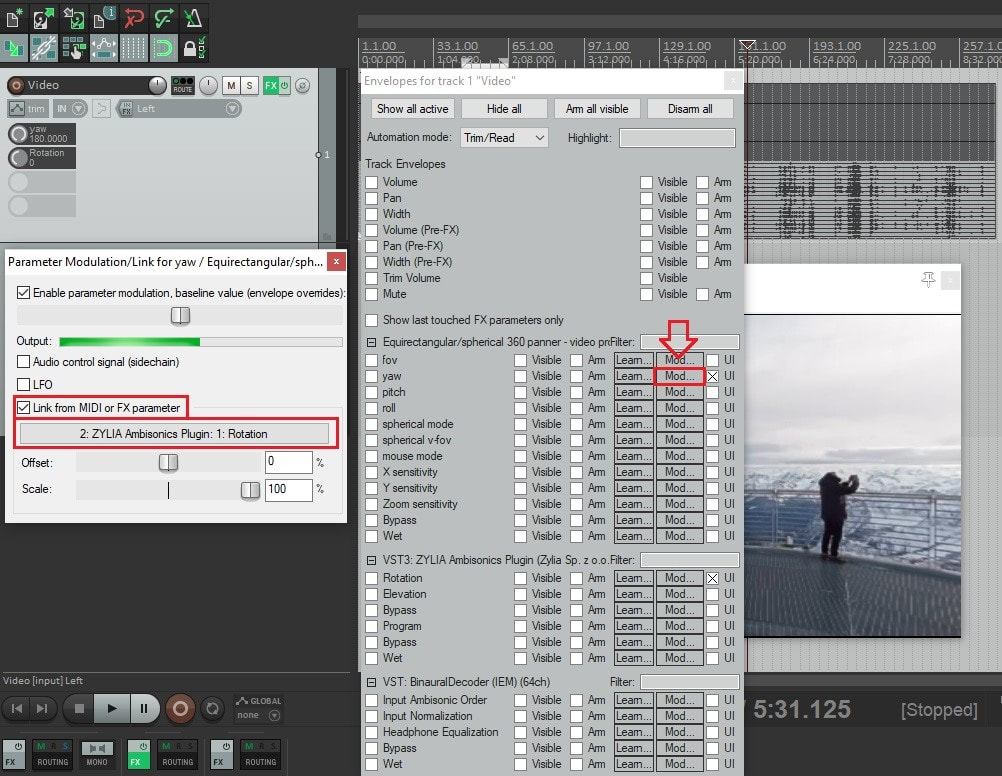 Step 12 – Align the position of the audio and video using the Offset control. On the Parameter Modulation window you are able to fine-tune the rotation of the audio with the video. Here we changed the ZYLIA Ambisonics plugin Rotation Offset to -50 % to allow the front of the video match the front of the ZM-1 microphone. 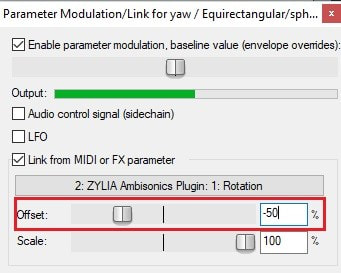 Step 13 – Change the Envelope mode to Write. To record the automation of this rotation effect, right-click on the Rotation parameter and select Envelope to make the envelope visible. 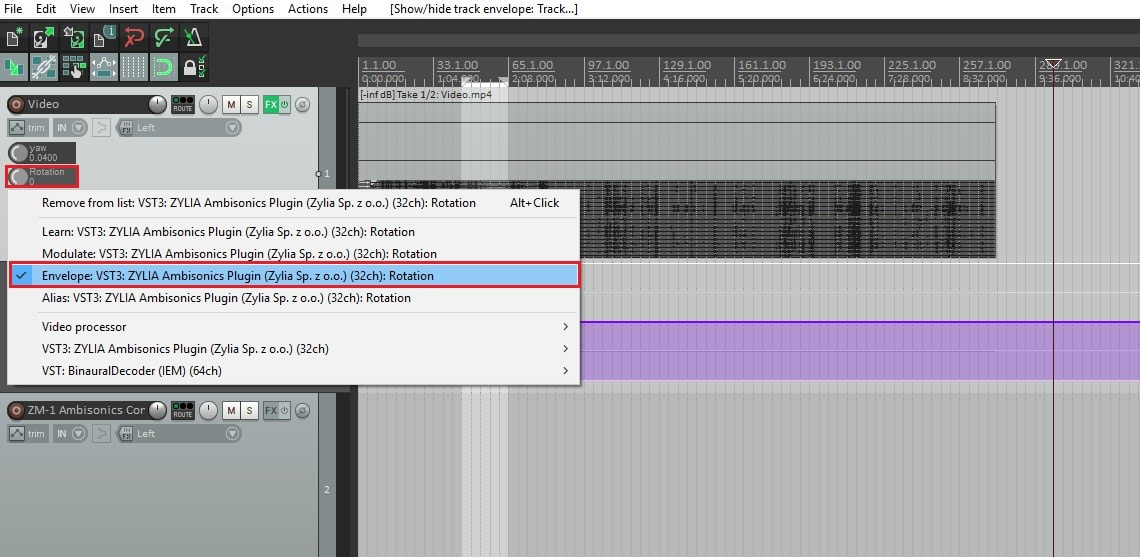 After, on the Rotation Envelope Arm button (green button), right click and change the mode to write. 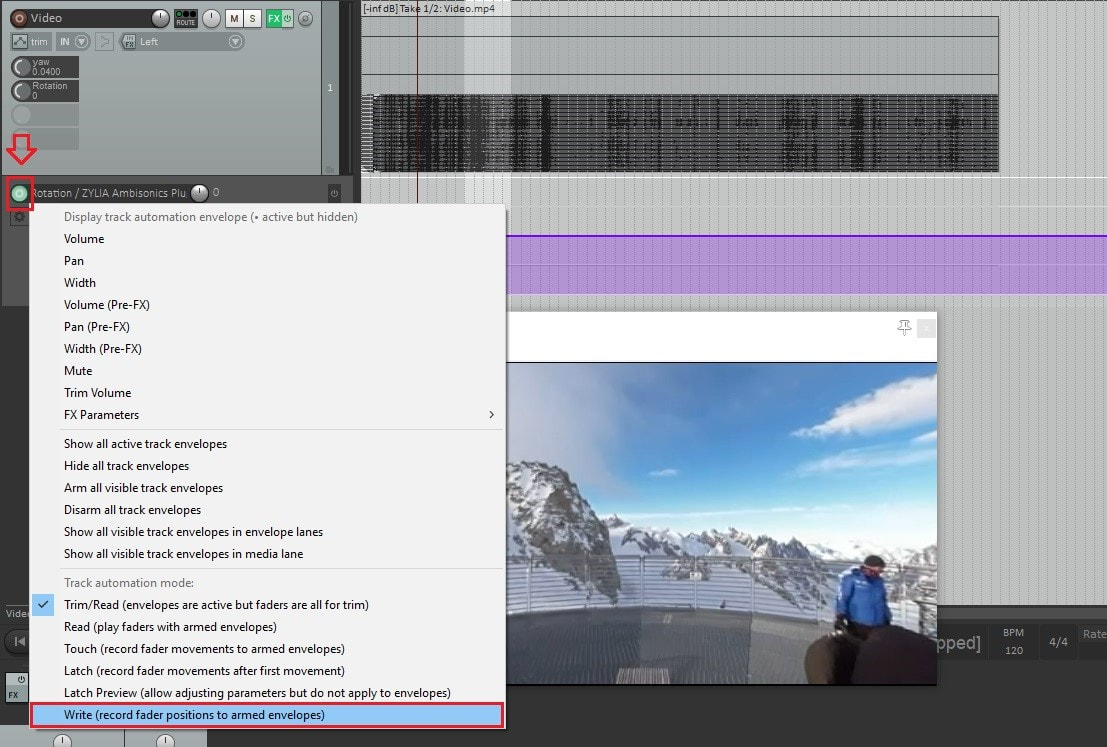 By pressing play you will record the automation of video and audio rotation in real time. Step 14 – Prepare for Rendering After writing the automation, change the envelope to Read mode instead of Write mode. 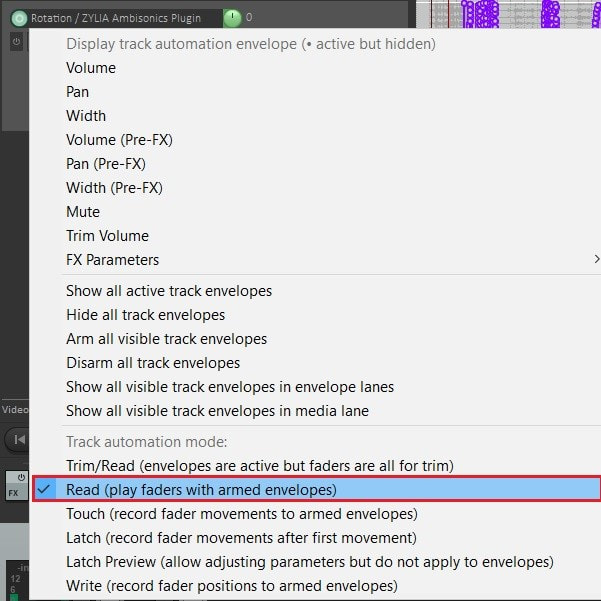 Disable the parameter modulation from the YAW control: Right click on Yaw and uncheck “Link from MIDI or FX parameter” 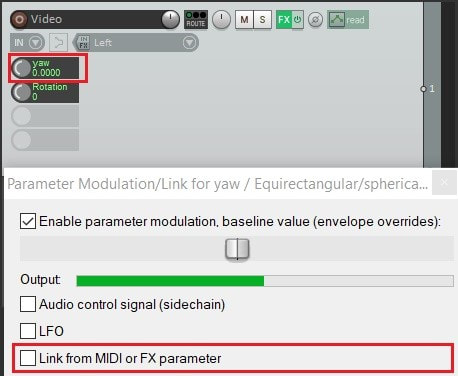 OPTIONAL: Replace your video file with the uncompressed version. If you have been working with a compressed video file, this is the time to replace it with the original media file. To do this, right click on the video track and select item properties. 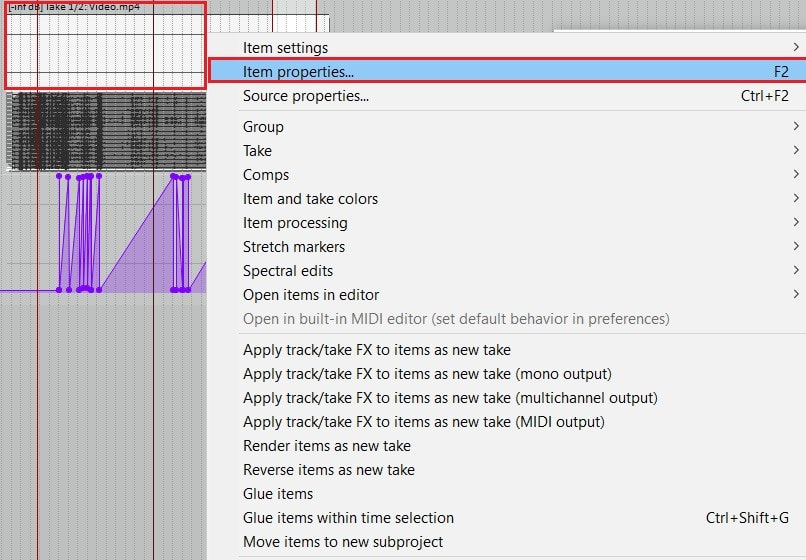 Scroll to the next page and click Choose new file. Then select your original uncompressed video file. 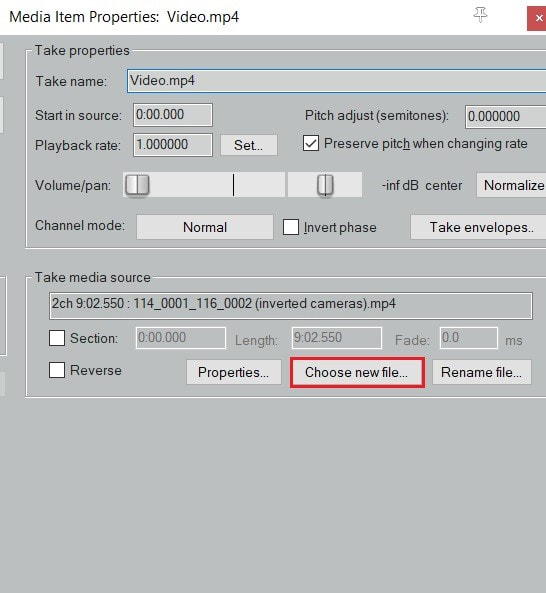 Step 15 – Render! You should now have your project ready for Rendering. Click on File – Render and set Channels to Stereo. On the Output format choose your preferred Video format. We exported our clip in .mov file with video codec H.264 and 24bit PCM for the Audio Codec. 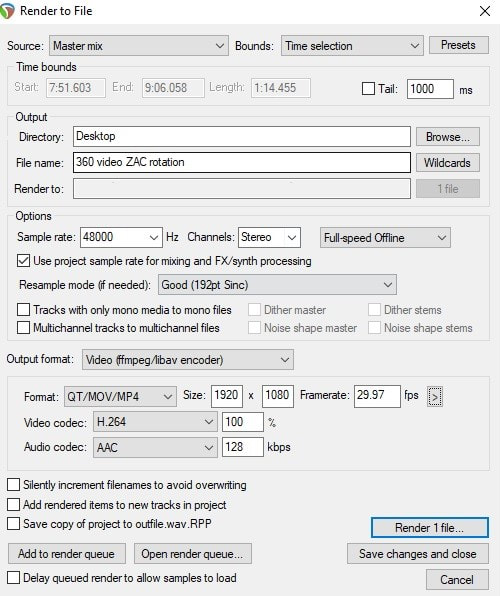 Thank you for reading and don’t hesitate to contact us with any feedback, questions or your results from following this guide.
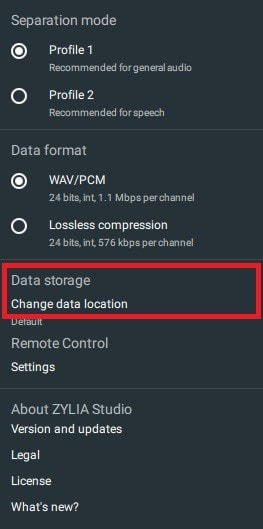
If you would like to move/copy all sessions and recordings from one device to another, first open the ZYLIA Studio directory. The default location is: Windows: "C:/Users/<user_name>/AppData/Local/Zylia/ZYLIA Studio" MacOS: "/Users/<user_name>/Library/Application Support/Zylia/ZYLIA Studio" Copy the folders “calibration” “sessions” and also the file “ZS.sqlite” to a pen drive/ external disk.
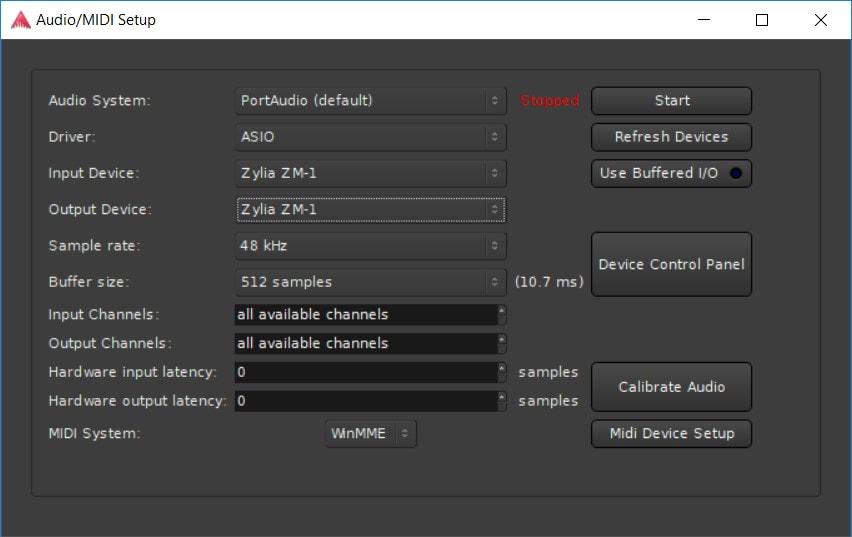
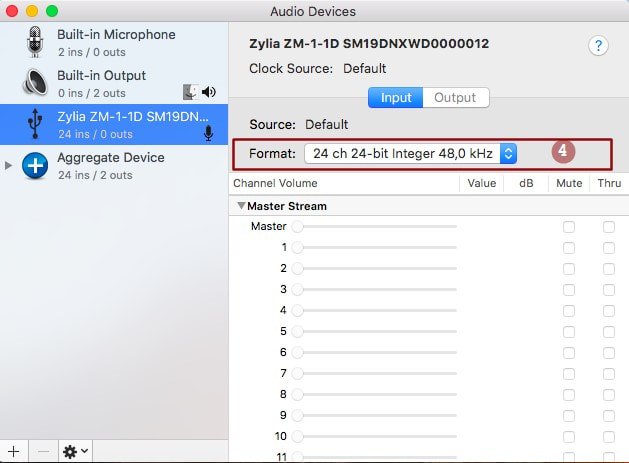
We are thrilled to present you the new ZYLIA ZM-1 driver with a long-waited gain control possibility. This feature introduced by Zylia Team is the answer for our clients’ request and feedback. The gain control feature allows you to increase a digital gain of ZYLIA ZM-1 input signal up to 70 dB using ZYLIA Control Panel as well as the Audio MIDI Setup application. The gain amount is stored in the system, so if your recording conditions don't change there is no need to set it before the next session. 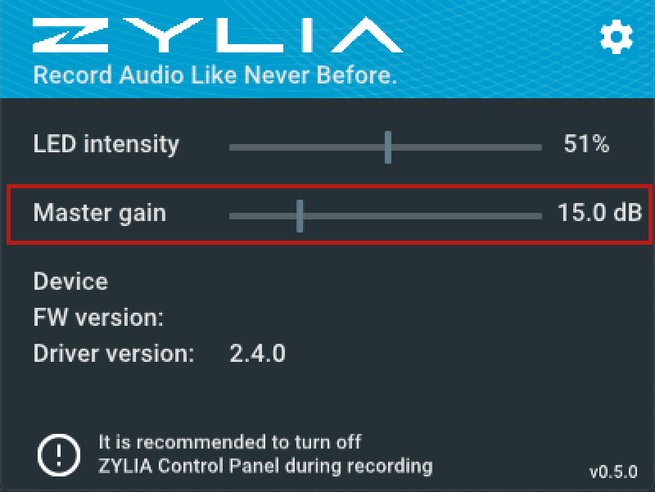 ZYLIA Control Panel 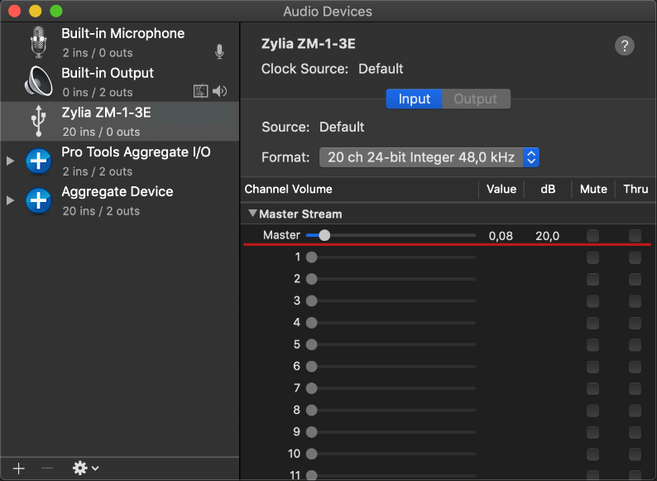 Audio MIDI Setup application Watch this tutorial for step-by-step instructions.
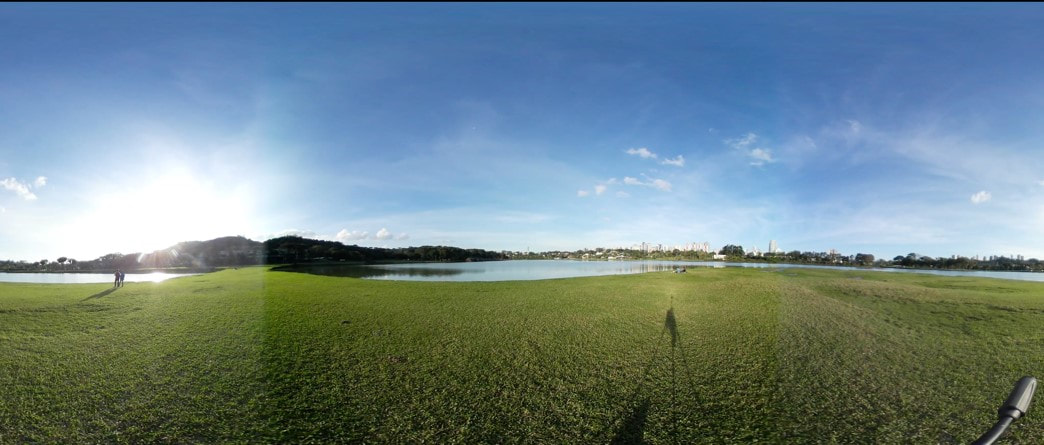
By Eduardo Patricio In this post we present two videos in different formats, but edited from the same source material captured on the 20th of June 2018, at Barigui park (Curitiba, Brazil). The audio was recorded with the ZYLIA ZM-1 3rd order Ambisonics spherical microphone array while the video was captured by a 360-degree camera (Gear 360). Below, you can watch both videos and find some information on how to achieve the two different results, with focus on preparing the audio recorded with the ZM-1 microphone for each scenario. Scenario AInteractive, immersive video with full 3D sound (media components: 360-degree video + Ambisonics audio) Scenario BNon-interactive video with fixed perspective 3D sound (media components: Tiny planet” video + binaural audio)
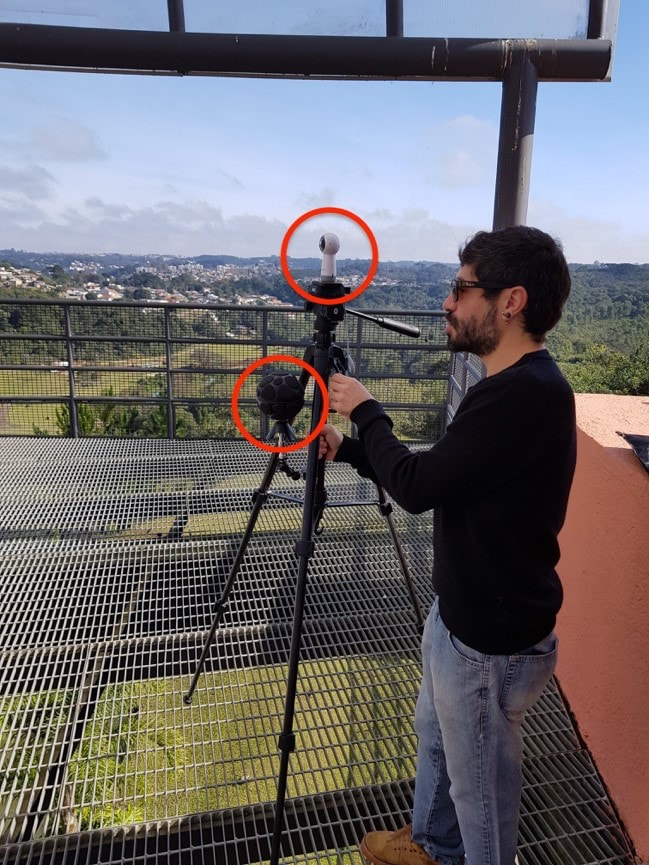
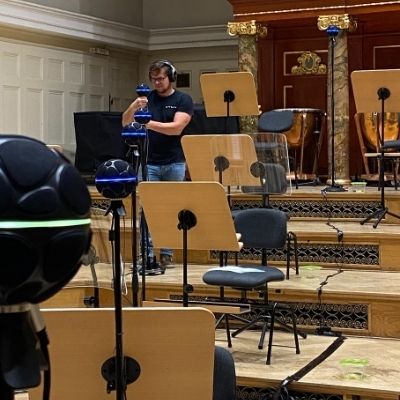
The microphone and the camera were placed on a single camera stand with a small clamped extension arm (see picture below). Both devices were aligned vertically with a small horizontal offset. We made sure the microphone and the camera always had the same relative facing direction (front of the microphone aligned with the camera side where the recording button is found).
For scenario B, we used the video from Gear 360 in ‘tiny planet’ format and a binaural audio track. Since, the source material is the same as the one from scenario A, we’ll list here only the steps that differ. Scenario B steps:
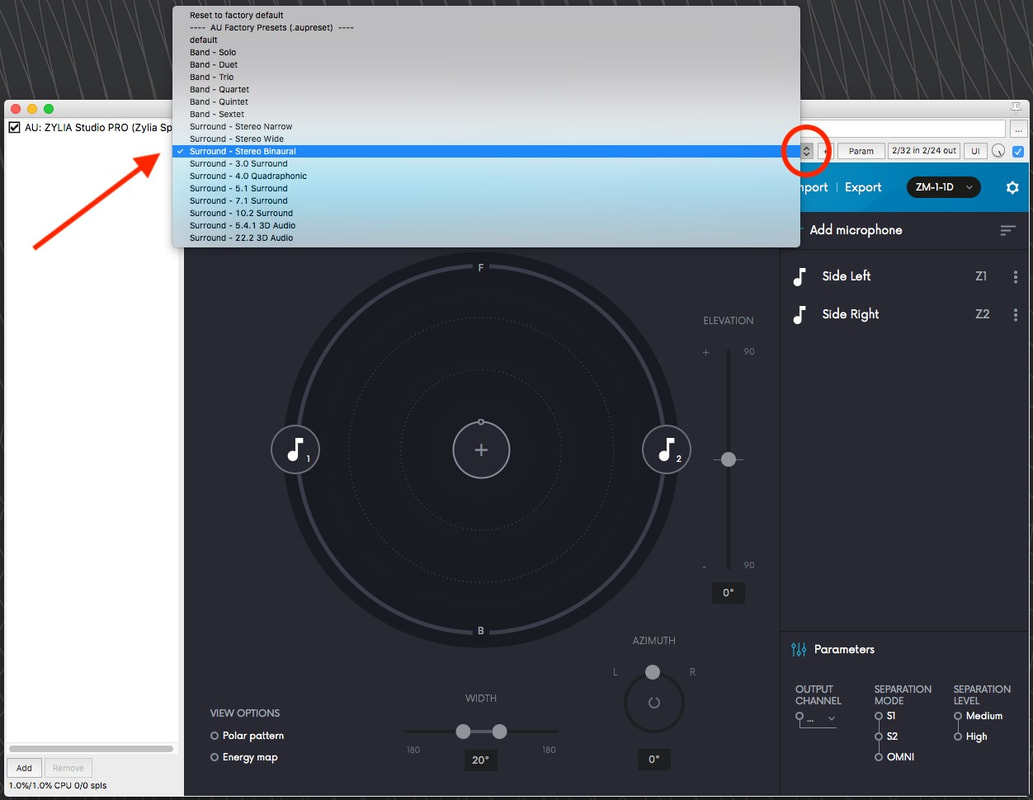 Choosing binaural preset on ZYLIA Studio PRO in REAPER #ambiencerecording #ambisonics #binaural #soundscapes #immersiveaudio #360recording
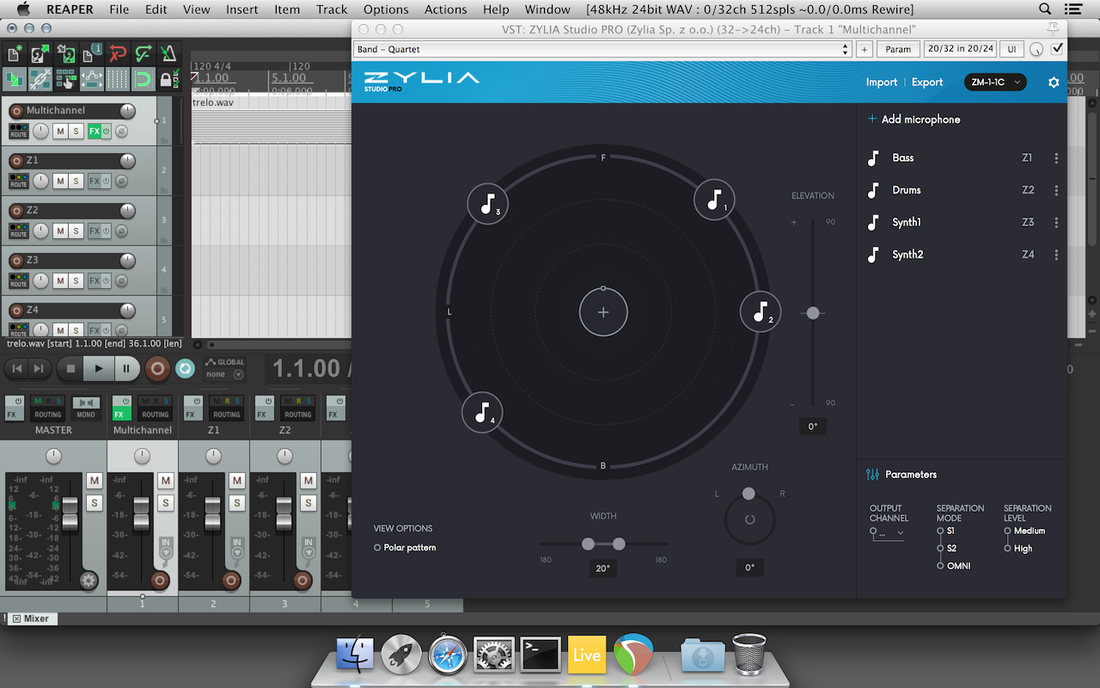
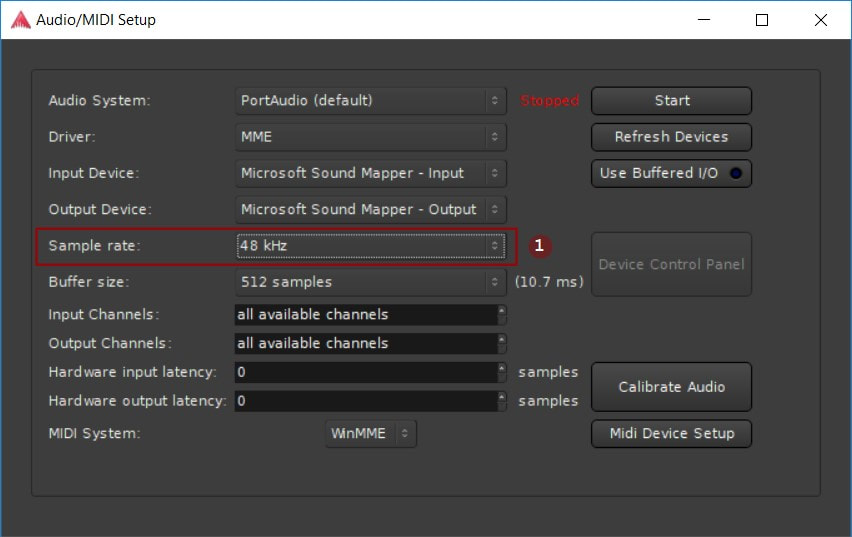
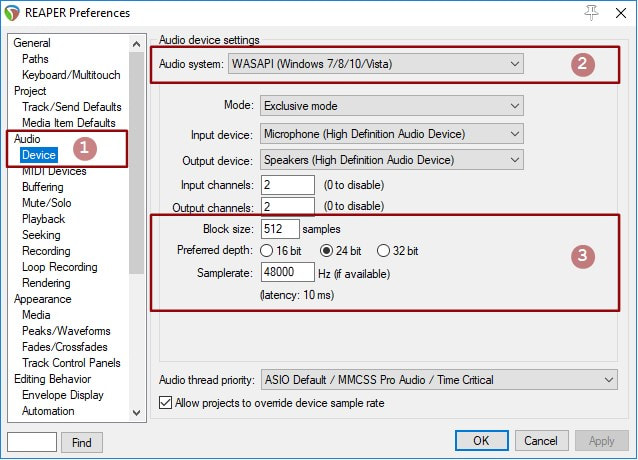
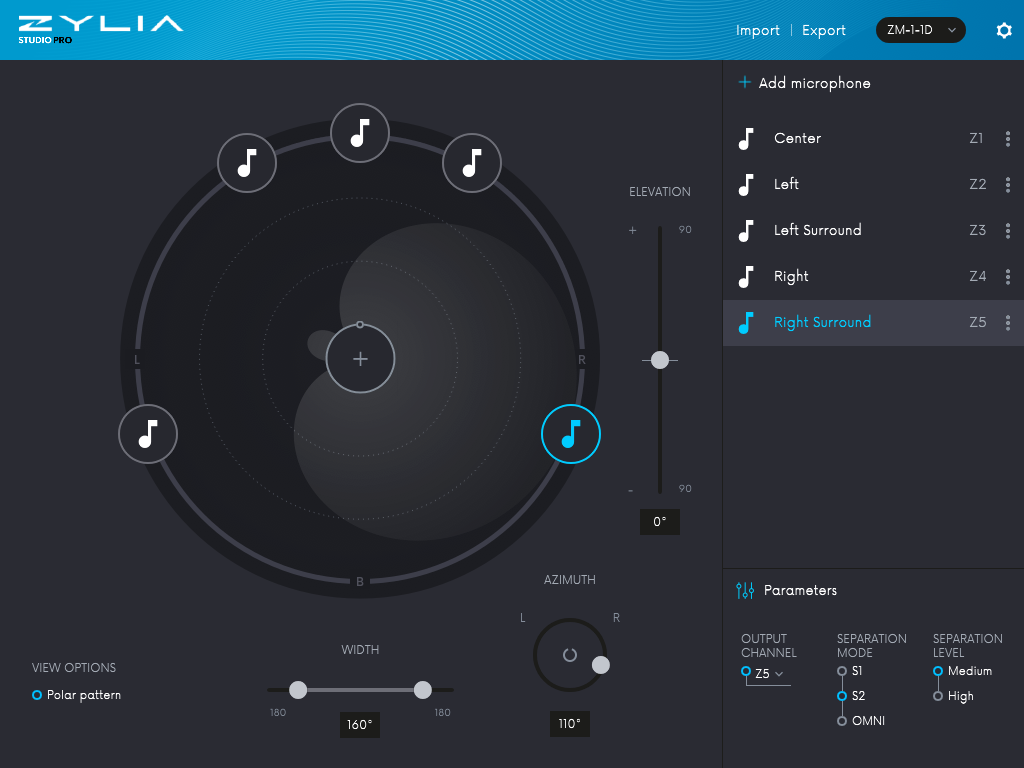
By Zaneta Lejwoda ZYLIA Studio PRO is an innovative VST/AU plugin which allows you to separate sources from ZYLIA ZM-1 microphone recording in a real-time. It requires 64-bit DAW with at least 19 channels per track. You can create up to 24 "virtual microphones", adjust and automate parameters of them such as azimuth, elevation and polar pattern. Because of this multichannel processing you can't use ZYLIA Studio PRO directly within ProTools but there is a way to mix signals from „virtual microphones” in this DAW – you can use ReWire protocol. ReWire allows you to connect two applications, where first is a master (it's called "ReWire Mixer") and second is a slave ("ReWire Device"). In this tutorial, we will use ProTools as ReWire Mixer and Reaper as ReWire Device. Reaper is a digital audio workstation, it handles up to 64 channels per track and it's perfect to use it with ZYLIA Studio PRO. TUTORIALFirst of all, we need a host for ZYLIA Studio PRO plugin – Reaper (if you haven't installed it yet – now it's good time to do it). Run Reaper, open Preferences – Plugins – ReWire/DX and enable the option "Check for ReWire mixer/device on startup (and automatically enter slave mode if present)", click "OK" and close application (Fig. 1). 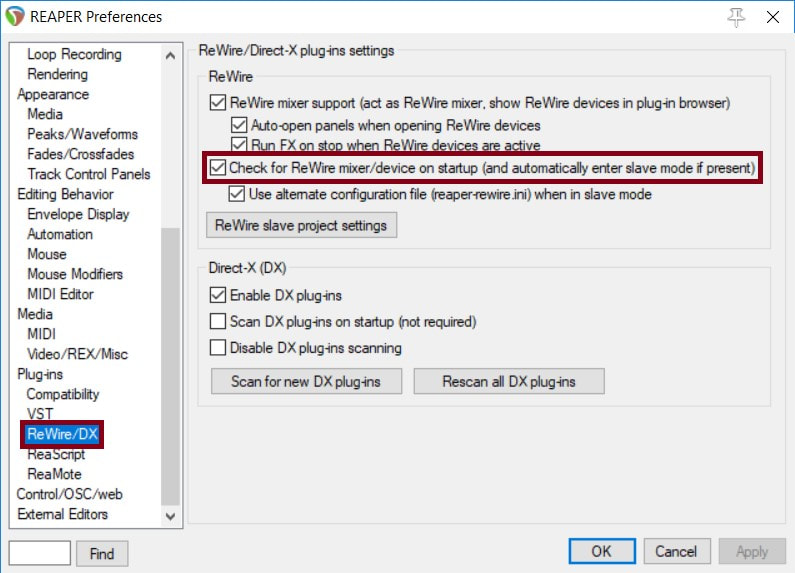 Fig. 1: Reaper, ReWire configuration. Next, open Pro Tools and make a new session – remember that ZYLIA requires 48 kHz sample rate (Fig. 2). Create new tracks for all sources („virtual microphones”) you want to use in your mix. 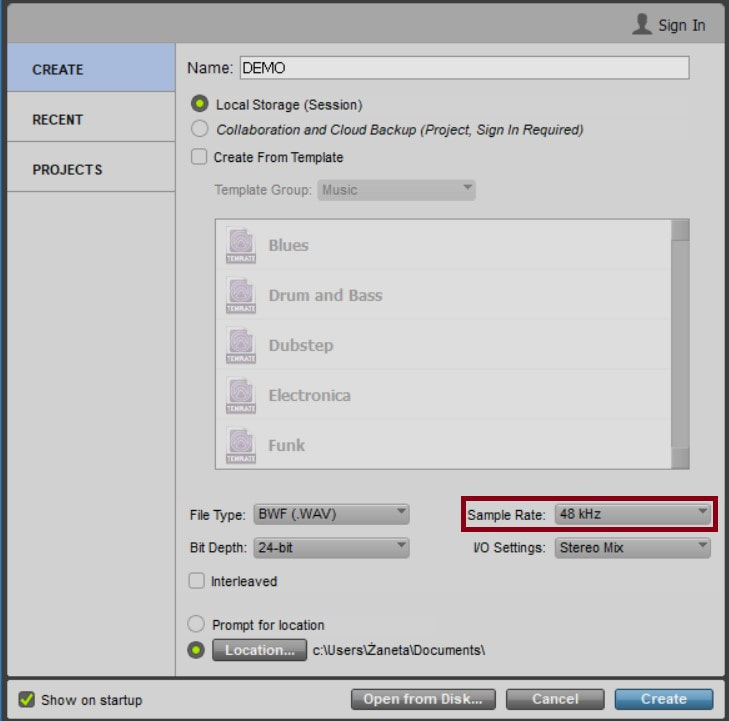 Fig. 2: Pro Tools, audio settings. Open Reaper, configure session and import your recording (you can use our template). Now, the application should run automatically in the slave mode – you should be able to see "ReWire Slave (or just ReWire) on the menu bar, next to your audio settings. Open Routing Matrix (View – Routing Matrix) Delete send of Master Bus to ReWire Output 1(stereo) and send your virtual microphones' tracks to ReWire Mono Output - in this case it's Output 3 to 6 (Fig. 3). Now, you can go back to Pro Tools. 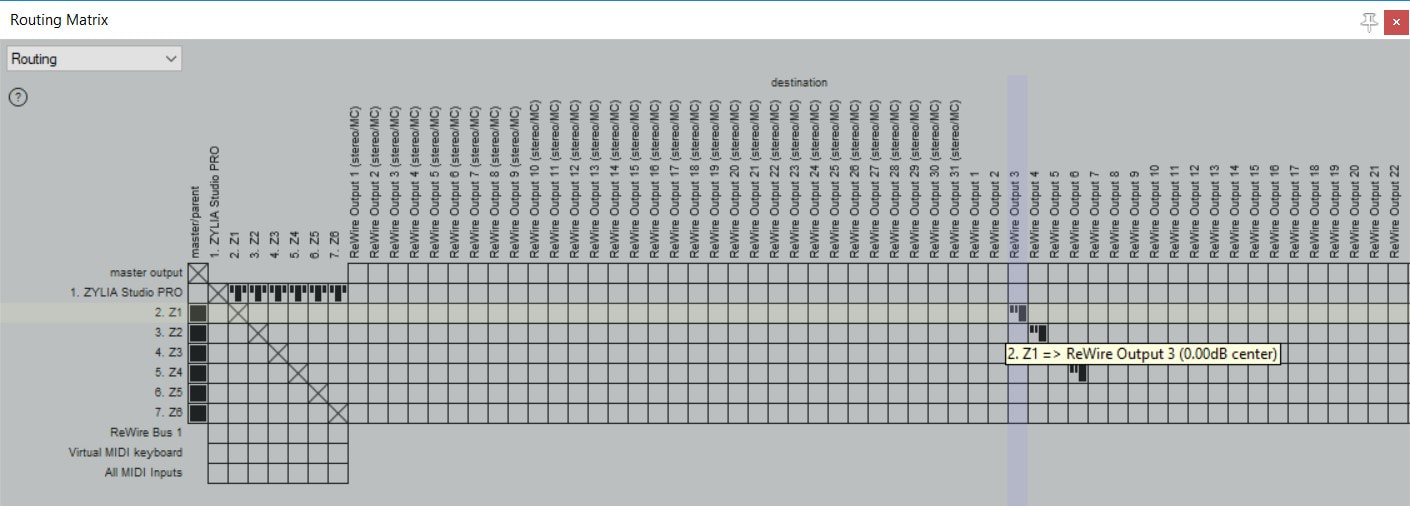 Fig. 3: Reaper, routing matrix. On previously prepared tracks insert Reaper, click on insert field, choose Multi-mono plug-in – Instruments – Reaper (Fig. 4). 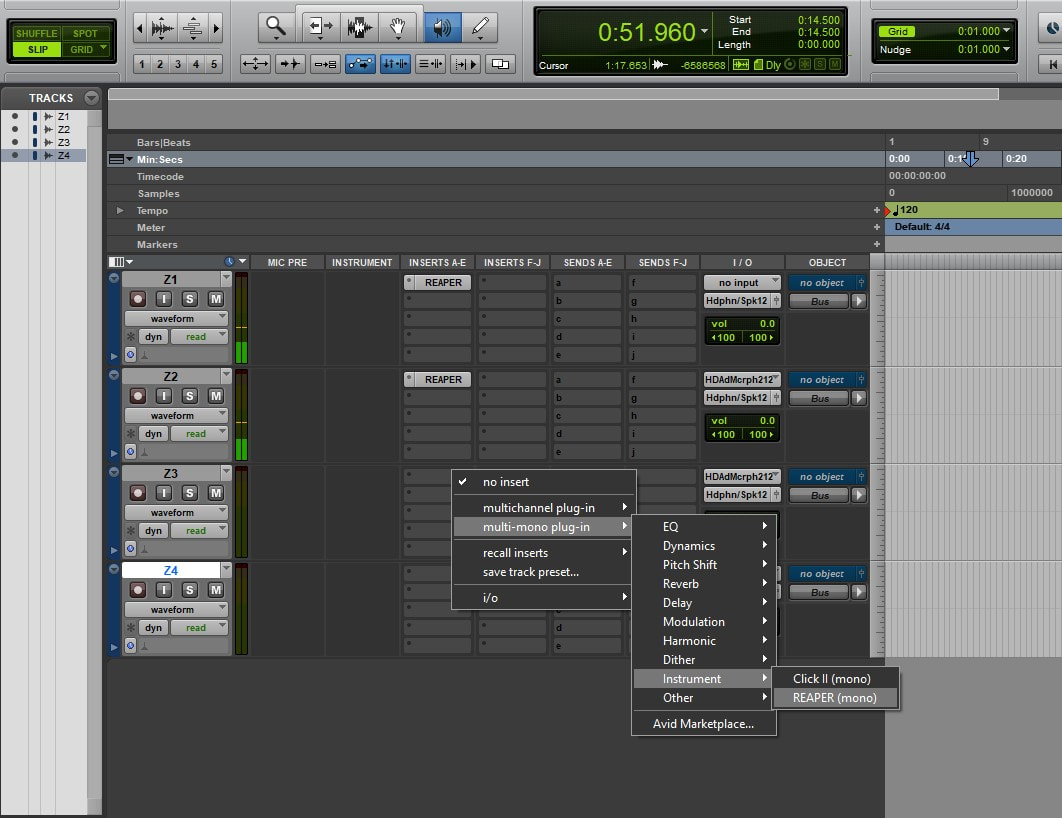 Fig. 4: Pro Tools, Reaper inserting. After doing that you will see the window with ReWire logo, in which you can choose ReWire Output (picture below). In this case, Z1 track in Reaper is connected to ReWire mono output number 3, so Pro Tools' Z1 track is assigned to ReWire Output 3 and so forth (Fig. 5). 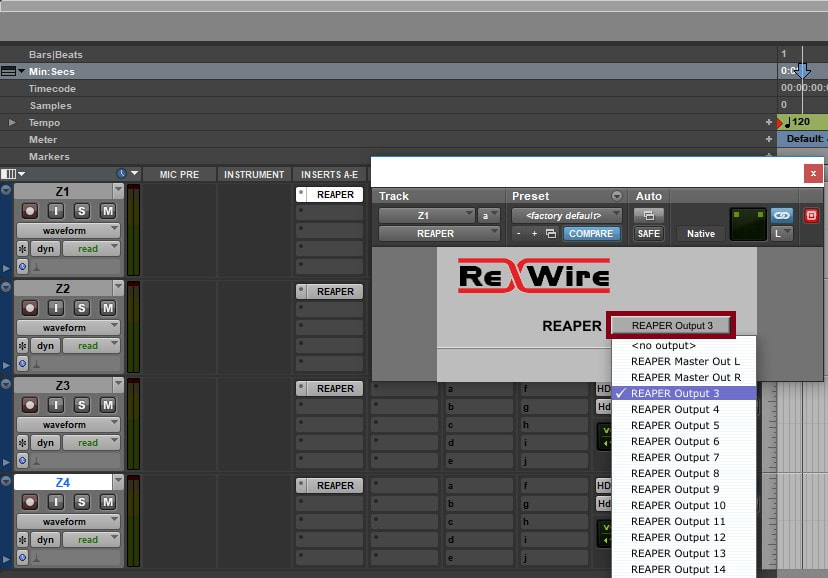 Fig. 5: Pro Tools, choosing ReWire Output fo Z1 track. That's all, now you should be able to hear all your virtual microphones in Pro Tools – just insert your favorite plugins and have fun mixing!
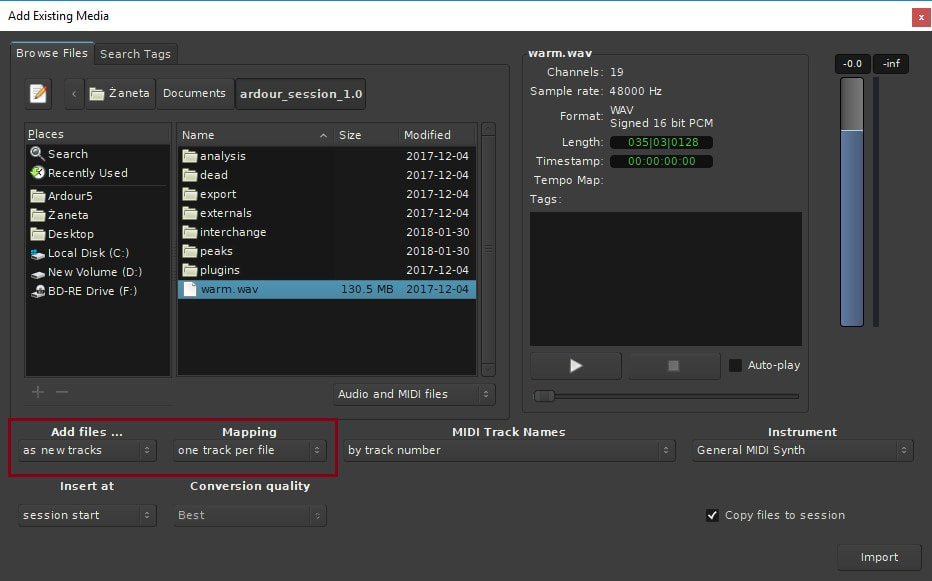
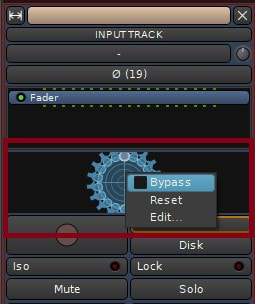
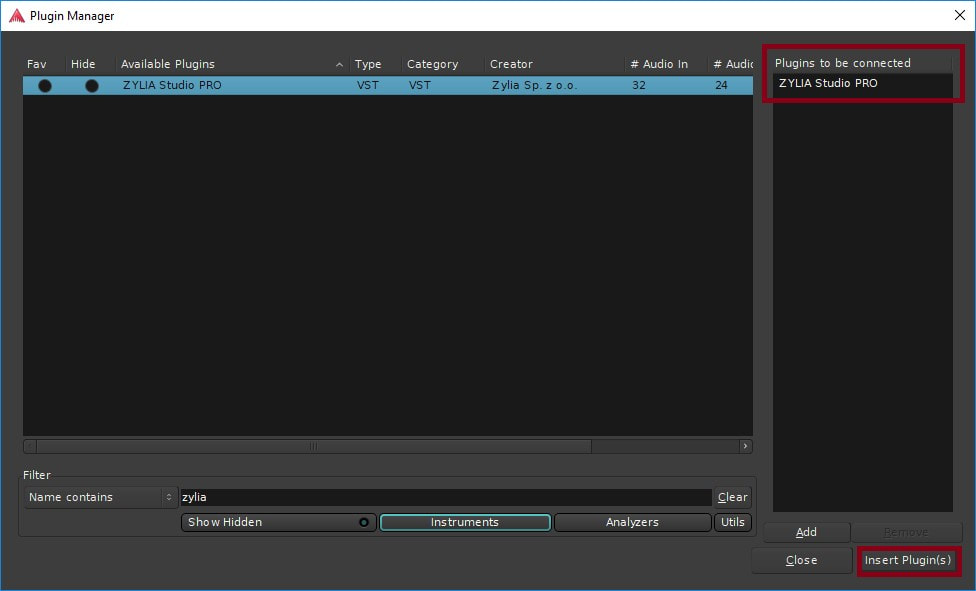
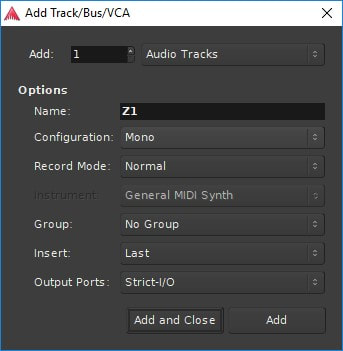
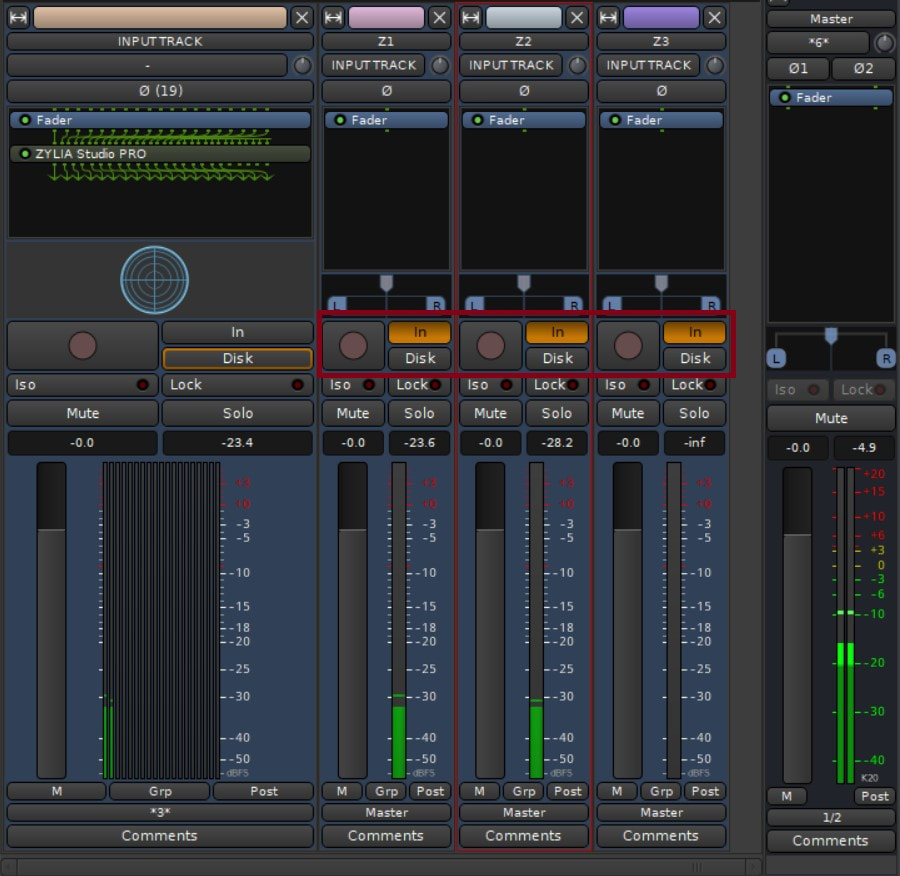
by Zaneta Lejwoda In this article, we will show how to configure Ardour session to work with ZYLIA Studio PRO. Briefly, we connect 19-channel track recorded with ZYLIA ZM-1 microphone with "output" tracks for virtual microphones (and leave out the connection to master) and then route "output" tracks to the master bus. Mixing
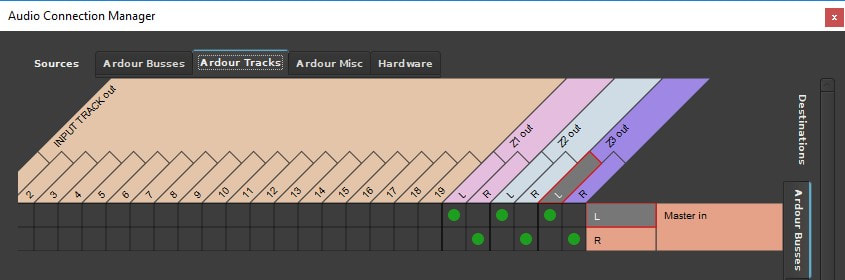
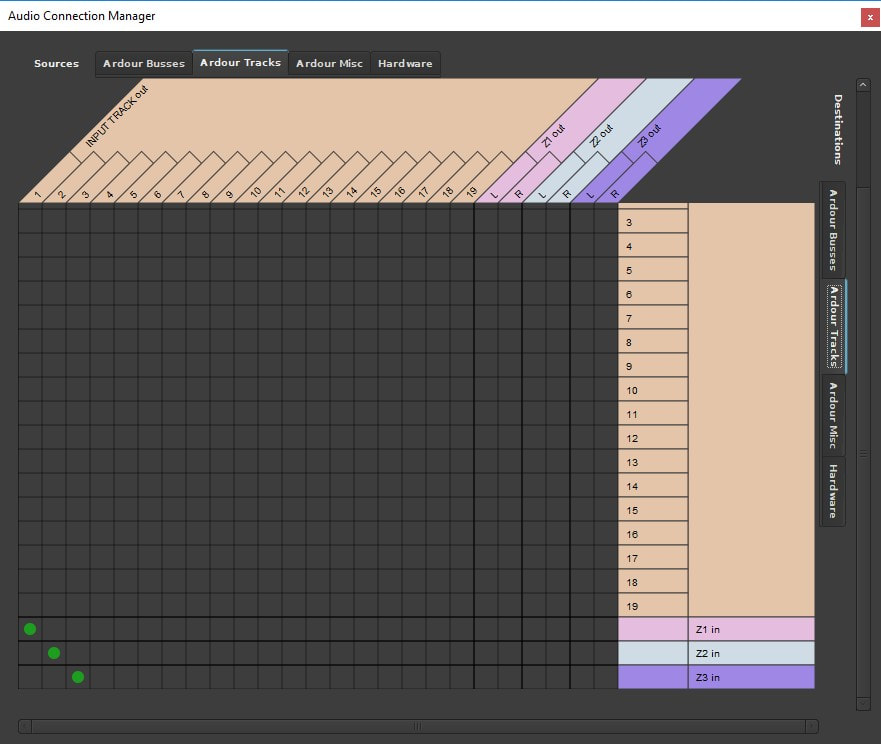
Now the most complicated thing – routing. Open Audio Connection Manager (Window → Audio Connections or Alt+P). In this window, you can see a matrix of Sources and Destinations.
Recording
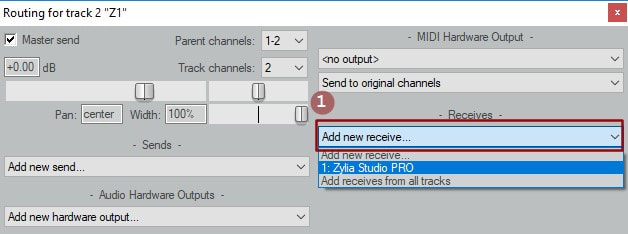
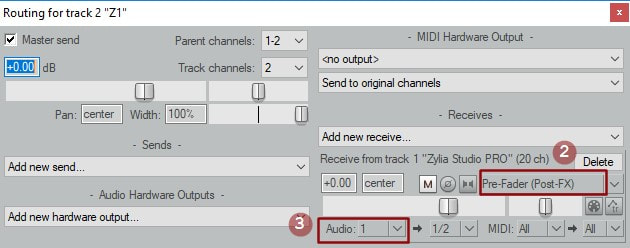
By Zaneta Lejwoda In this tutorial we will explain how to configure Reaper session to work with ZYLIA Studio PRO software. Mixing
Routing
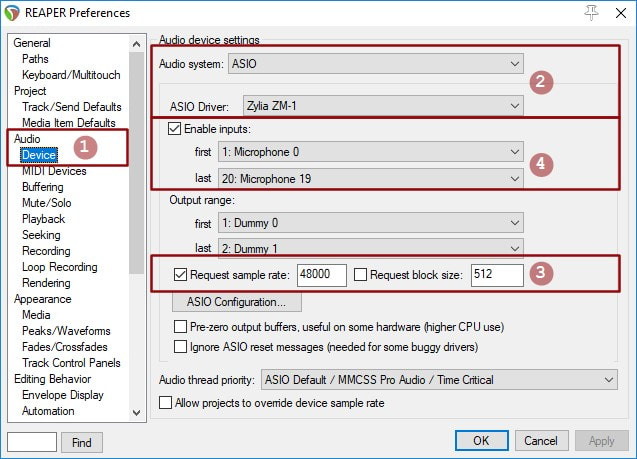
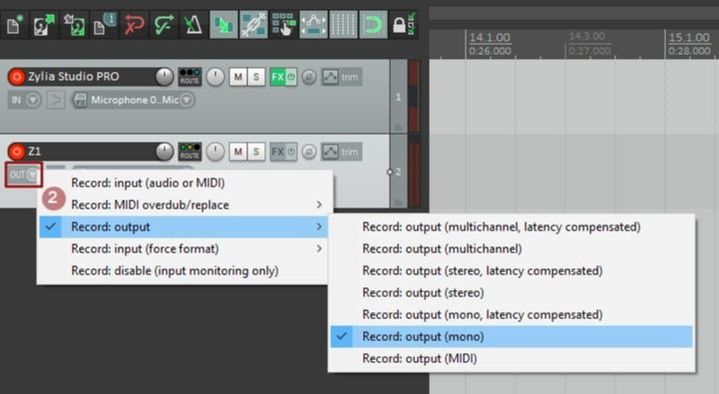
Similar settings are applicable for more virtual microphones – just add more “output” tracks and set them up as above (remember to choose a proper audio input channel number). RecordingIt is possible to record directly from a ZM-1 microphone into a Reaper DAW.
Routing Routing for recording is similar to a mixing setup. You should add track for 19-channel recording with plugged ZYLIA Studio PRO and “output” track for each virtual microphone. Remember to set up appropriate number of “Zylia Studio PRO” track’s channels and assign each “output” track’s audio input to corresponding virtual microphone output.
AppendixInput monitoring using Aggregate Device (available only for macOS users).
Downloads:
ZYLIA Studio PRO Reaper Template
By Jakub Zamojski & Lukasz Januszkiewicz Recording and mixing surround sound becomes more and more popular. Among the popular multichannel representation of surround sound systems like 5.1, 7.1 or cinematic 22.2, especially worthy of note is an Ambisonics format, which is a full-sphere spatial audio technique allowing to get a real immersive experience of 3D sound. You can find more details about Ambisonics here (What is the Ambisonics format?). Our previous blog post “2nd order Ambisonics Demo VR” described the process of combining audio and the corresponding 360 video into fine 360 movie on Facebook. Presented approach assumes using of 8-channel TBE signal from ZYLIA Ambisonics Converter and converts audio into the Ambisonics domain. As a result we get a nice 3D sound image which is rotating and adapting together with the virtual movement of our position. However, it is still not possible to adjust parameters (gain, EQ correction, etc.) or change the relative position of the individual sound sources present in the recorded sound scene. In this tutorial we are going to introduce another approach of using ZYLIA ZM-1 to create a 3D sound recording, which gives much more flexibility in sound source manipulation. It allows us not only to adjust the position of instruments in recorded 3D space around ZYLIA microphone, but also to control the gain or to apply any additional effects (EQ, Comp, etc.). In this way we are able to create a fancy spatial mix using only one microphone instead of several spot mics!
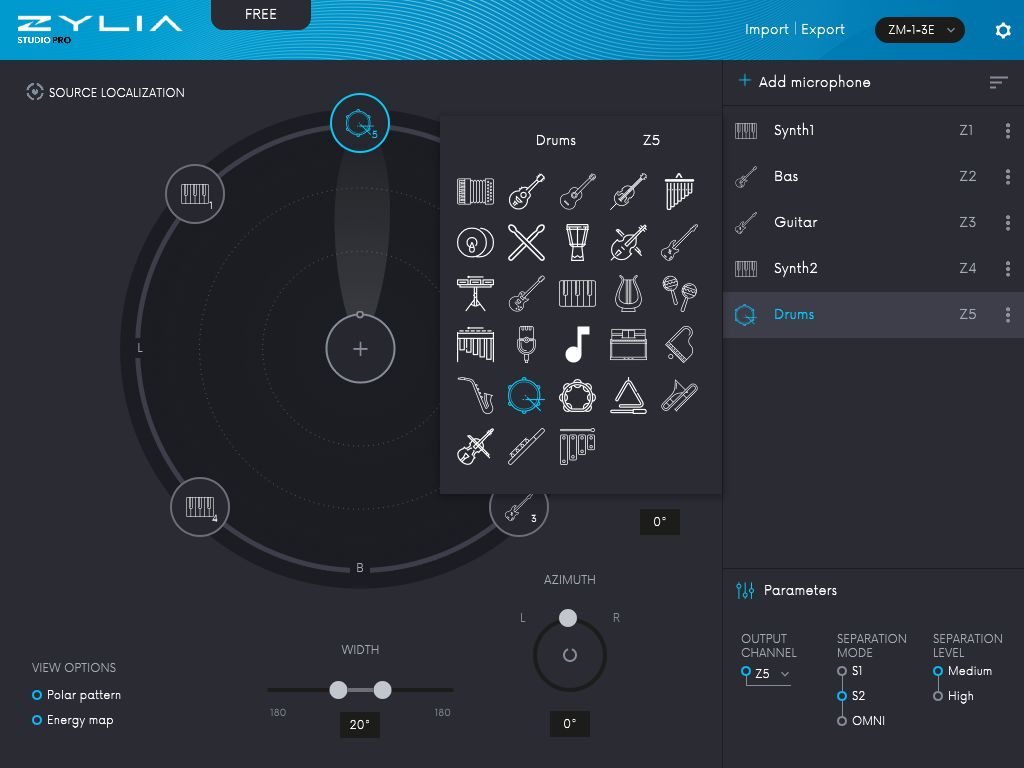
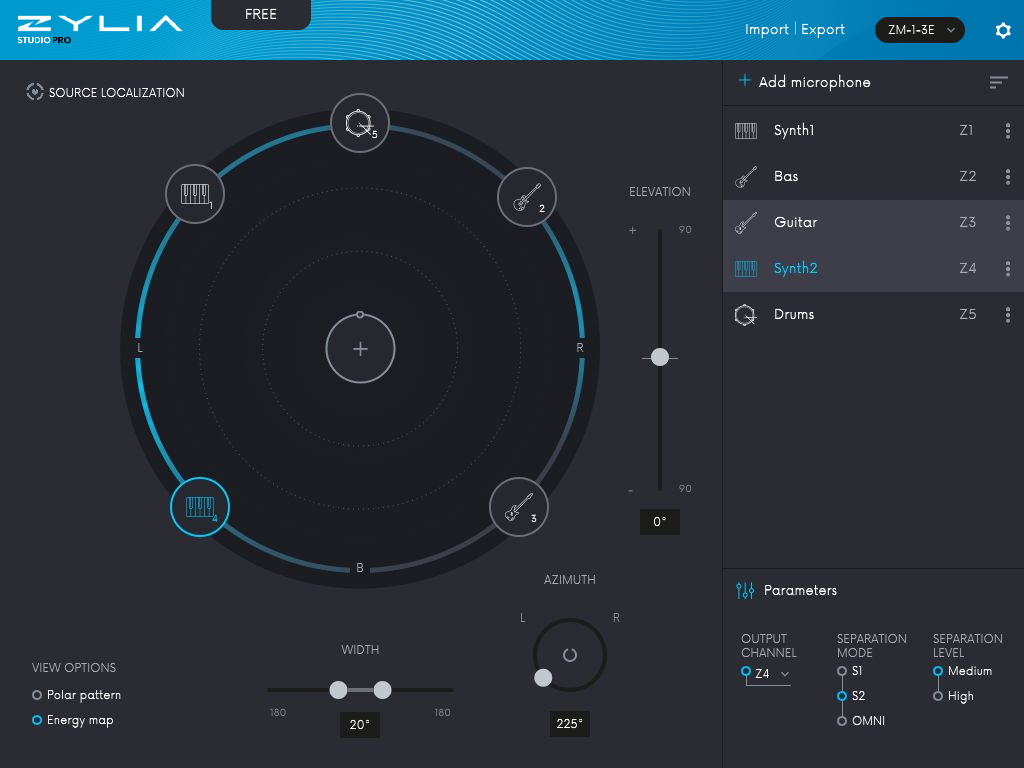
Spatial Encoding of Sound Sources – TutorialIn the end of July 2017, using ZYLIA ZM-1 microphone we have recorded a band called “Trelotechnika”. All band members were located around ZM-1 microphone, 4 musicians and one additional sound source – drums (played from a loudspeaker). During the post-production process, we applied ZYLIA Studio PRO VST plug-in (within Reaper DAW) on recorded 19-channel audio track. This allowed us to separate the previously recorded instruments and transfer them into the individual tracks in the DAW. Those tracks were then directed to the FB360 plug-ins, where encoding to the Ambisonics domain was performed. “Spatial Encoding of Sound Sources” - a step-by-step descriptionBelow, you will find a detailed description of how to run a demo session presenting our approach of recording and spatial encoding of sound sources. Demo works on Mac Os X and Windows. DOWNLOAD STAGE
TUTORIAL After opening the session, you will see several tracks:
 3. Separated signals from ZYLIA Studio PRO are passing to 5 individual tracks. You are able to adjust the gain, you can also mute or solo instruments, or you can apply some audio effects. A good practice is to use a high-pass filter for non-bass and low-pass for bass instruments to reduce a spill between them. We applied these filters to our session:  4. Spatialiser track – receives 5 signals from tracks with separated instruments. Spatialiser allows to distribute sound sources in desired positions in the 3D space. a) Click on FX and choose FB360 Spatialiser.
d) Back to Spatialiser view. You will see an equirectangular picture and five circles with numbers. Each circle represents a sound source position in the space. By default, sources are located in the positions corresponding to the real positions of the instruments in the picture, but it is possible to adjust it by clicking on the circle and dragging it around the picture. 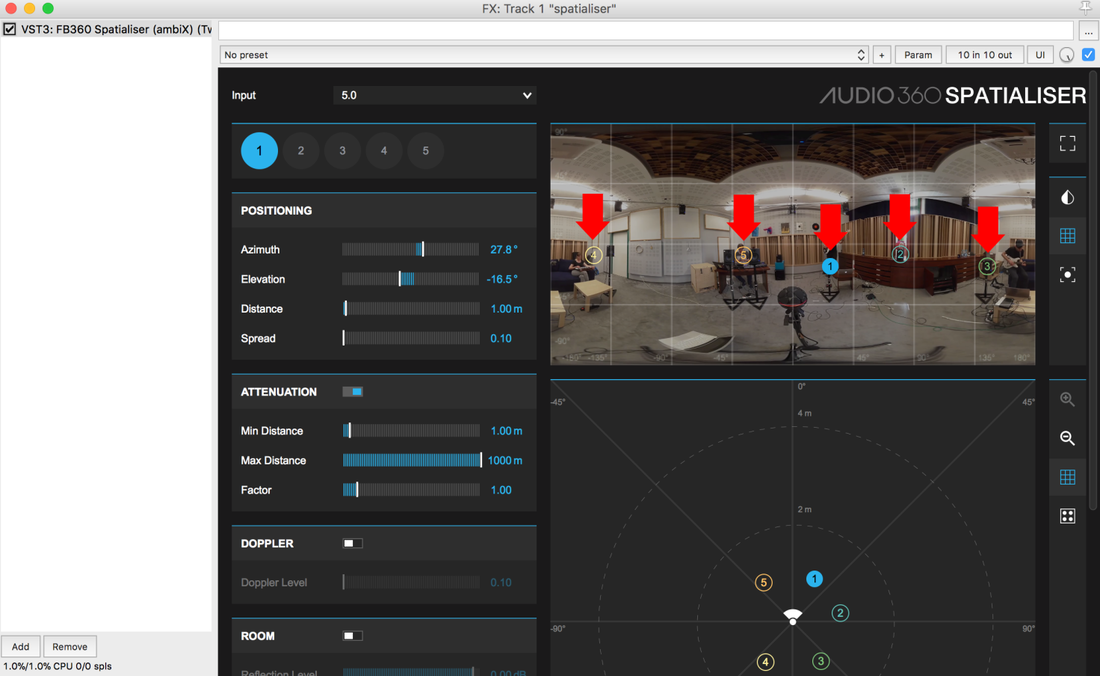
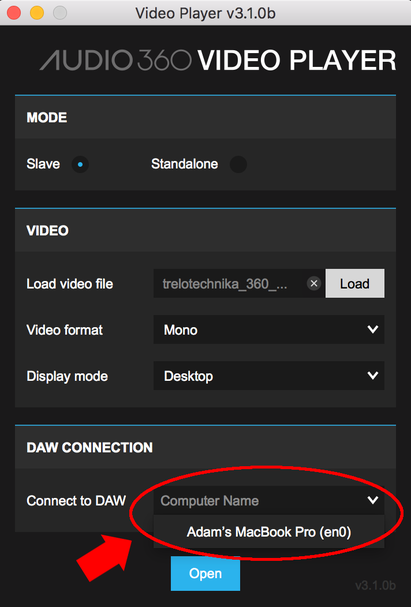
6. Now video is synchronized with audio. Adjusting the location of play-head in REAPER’s time line will affect the video’s time. Tap space bar to play audio and video. Rotation of the video in the player is tracked by the decoded and binauralized Ambisonics sound.
7. A good practice is to play video from the beginning of file to keep the synchronization. In some cases, it is necessary to close the VideoClient + VideoPlayer and load 360 video again to recover the synchronization. 8. Now you are able to rotate video across the pitch and yaw axis. Your demo is ready to run. by Maciej Lenartowicz Integrating new tools into existing work-flows may be a difficult task, especially when those tools introduce innovative features, such as “virtual microphones” in ZYLIA Studio PRO.
This article will guide you through the process of setting up a connection between ZYLIA Studio PRO (running within REAPER) and your DAW of choice (assuming it supports ReWire protocol).
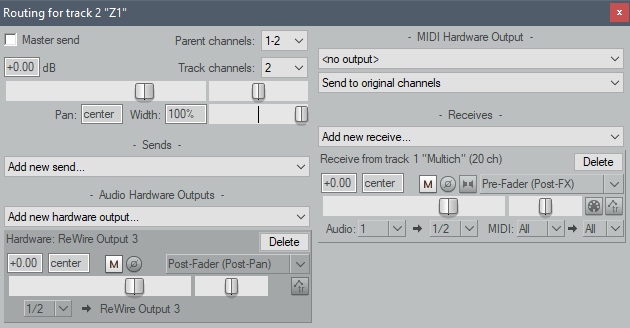
 Example session in REAPER with ZYLIA Studio PRO. Notice that REAPER runs in ReWire mode. 4. Now you can create a new project in REAPER or load existing one. Use ZYLIA Studio PRO as you would otherwise, i.e. create a new track for every virtual microphone, with just one exception – these new tracks won’t be sent to master track. To do so, enter “Routing” menu for a track in REAPER and disable “Master send” option. To route audio form virtual microphone out of REAPER, you need to select “hardware” output for a track. These are the very same channels that will be available in Ableton. Click on “Add new hardware output...” menu and select one of the outputs from the list. It is advised to start from “ReWire Output 3” (for Z1 virtual microphone) since first and second outputs are usually associated with a master track
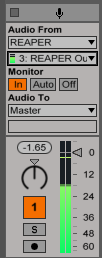
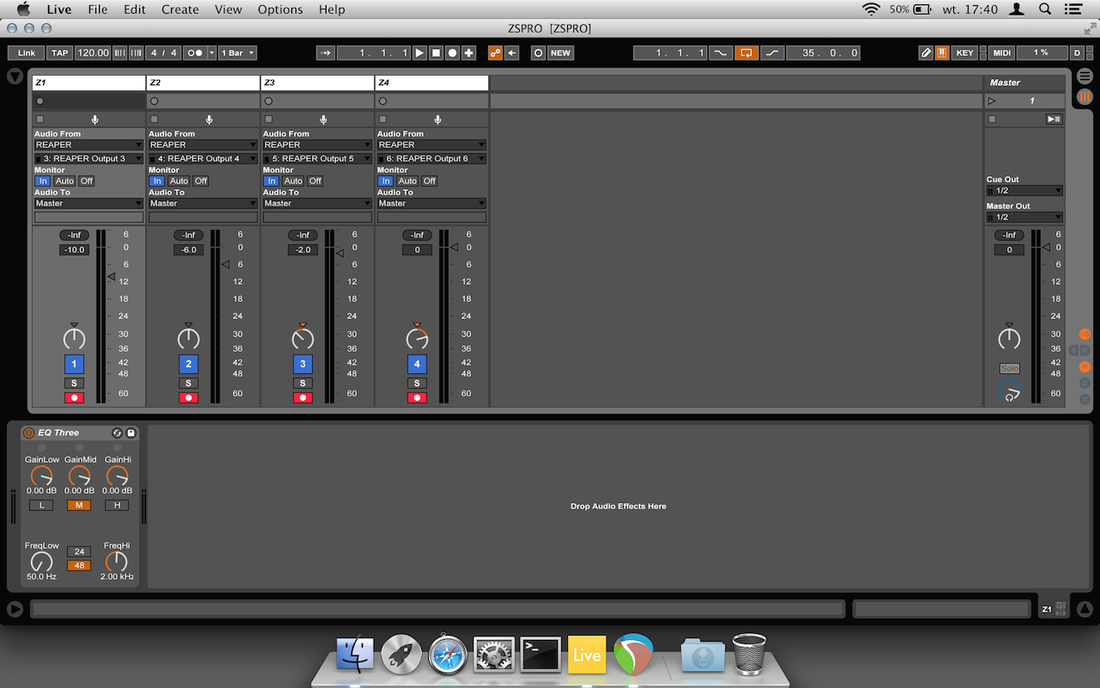 Ableton session set to receive audio from REAPER.
|
Categories
All
Archives
August 2023
|


 RSS Feed
|
|
Connect with us |
|
© Zylia Sp. z o.o., copyright 2018. ALL RIGHTS RESERVED.
|