|
In this release of ZYLIA Studio we bring a lot of performance and UI improvements. First thing you will notice during launch is a brand new splash screen shown during the application’s launch.  Second big improvement is the possibility to change the location where ZYLIA Studio stores its data. You can now select the data directory (directory where all ZYLIA Studio’s data is located) in the Options menu. Just click the cog icon, then in the section “Data storage” choose “Change data location”. This will restart ZYLIA Studio and use the new directory by default. You can select any directory you want, but we recommend using an internal or a fast USB drive due to data transfer limitations of standard USB flash drives, etc. You can also use this feature to transfer data between different instances of ZYLIA Studio 1.4.0. Finally, we improved memory management, which results in lower RAM consumption (up to 5 fold decrease!) and higher UI responsibility, especially for sessions with high number of recordings.
Based on your feedback, we improved how some controls work, like the solo/mute buttons or gain/pan sliders in the mixer. Some of animations were also updated for a better and smoother experience with ZYLIA Studio. Check it out now!
0 Comments
by Łukasz Januszkiewicz and Jakub Zamojski When Facebook 360 is not enough In July 2017, we had a pleasure to meet a vocal play band called Audiofeels (https://www.facebook.com/audiofeels/) and record their performance with our 19-capsules ZYLIA ZM-1. Then we used ZYLIA Ambisonics Converter and transformed the 19-channel recording into 8-channels TBE, which is 2nd order ambisonics format required by Facebook 360 Spatial Workstation plug-ins. The audio and the corresponding 360 video was combined into fine 360 movie and published on ZYLIA’s Facebook. Unfortunately due to additional audio compression, Facebook 360 player may introduce an audible decrease of audio quality. Another issue may be a presence of annoying pops and clicks during the playback - especially on slower PC’s. It is well known problem with 360 video and the 2nd order ambisonics audio playback. Flawless 360 movie In this article we describe how to run our short 360 movie flawless in offline mode - without any additional audio and video coding. Demo will work on MacOS and Windows machines, and here are the steps you need to take: Reaper software 1. Download and install Reaper software – https://www.reaper.fm/download.php The evaluation version is fully functional and perfect to run with our demo. 2. Download and install Facebook 360 Spatial Workstation software - https://facebook360.fb.com/spatial-workstation/ It is a free bundle of spatial audio VST plug-ins. 3. Download a Reaper session prepared by ZYLIA. It is already configured with our audio tracks and all required effects (download) 4. Download our 360 movie – two versions are available: high quality [3840x1920] (download) and medium quality [1920x960] (download). High quality version sometimes tends to pause in FB360 Video Player on slower CPUs. 5. Run Reaper and open the session (zylia_demo_vr.rpp) – you should see one track with 8‑channels WAVE file. Choose desired audio output device. 6. Click on FX button located on the track. If VST plug-ins are correctly installed, you will see FB360 Spatialiser, FB360 Control and built-in JS: Master Limiter. Make sure the Spatialiser is set to bypass mode (unchecked). 7. Click on Spatialiser and then click on “Load” button placed on the video grid. Video Player will open. Choose “Slave” mode and load provided video. You’ll see box “H264 is not a recommended codec” - click “X”. 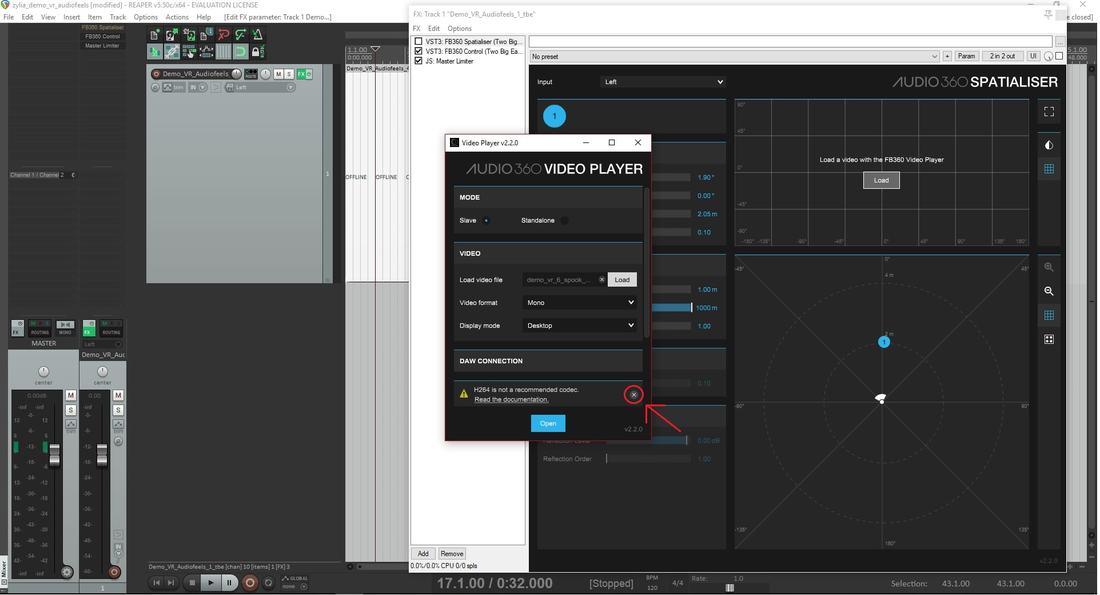 8. Set the video format to “Mono” and the display mode to “Desktop”. In “Connect to DAW” you should be able to choose your computer’s name. If not, try to restart Reaper and repeat the steps 6-8. You are ready to click on “Open” button. Video box will appear. 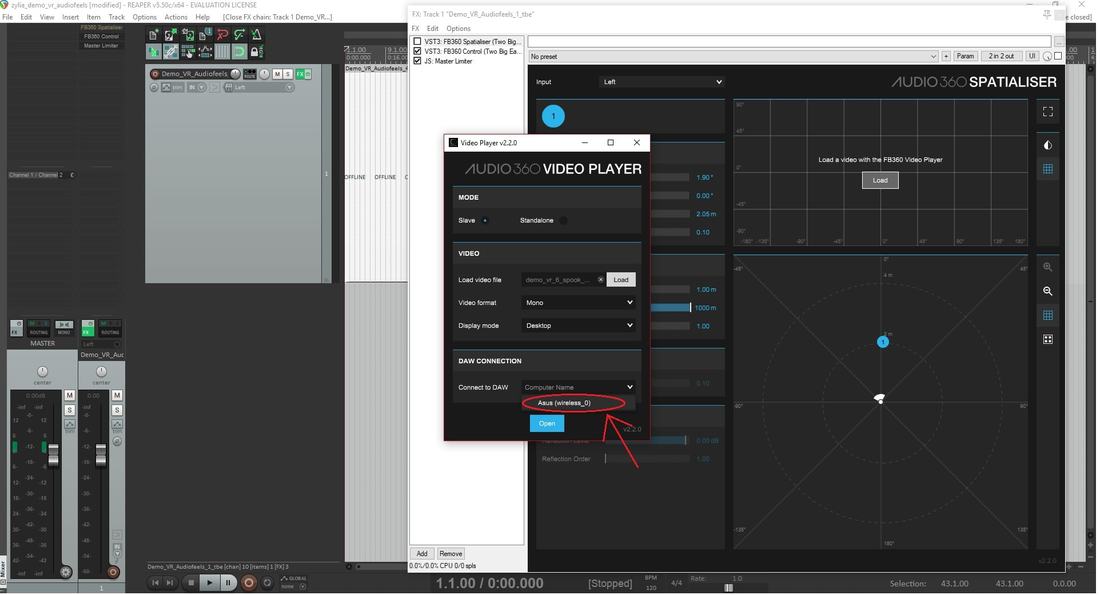 9. Back to FX window and click on FB360 Control. Ensure that “Listener Roll”, “Listener Pitch” and “Listener Yaw” are gotten from video – controls should be darkened. Open video box and try to rotate the image - “Pitch” and “Yaw” sliders should follow the image rotation. 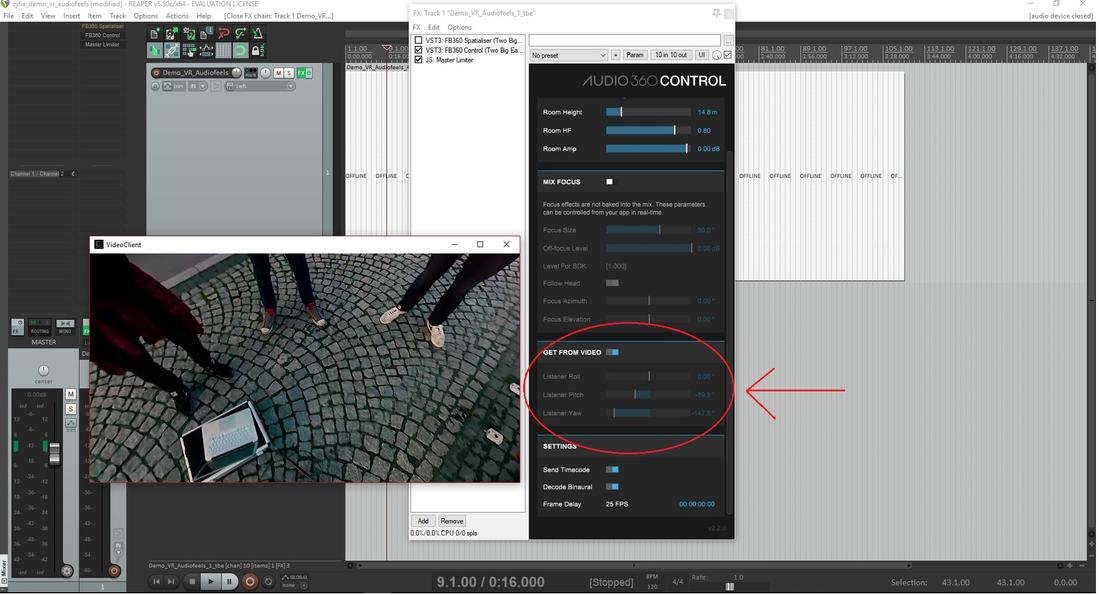 10. The video is synchronized with audio. Changing location of play-head in Reaper’s timeline affects on video’s time. Tap space bar to play audio and video. Rotation of video affects on binaural decoded ambisonics sound. 11. Good practice is to play video from the beginning of file to keep the synchronization. In some cases, it’s necessary to close the VideoClient + VideoPlayer and load 360 video again to recover the synchronization. 12. Your demo is ready to run. SpookSyncVR Another method to synchronize ambisonics audio and 360 video is to use SpookSyncVR (http://www.spook.fm/spooksyncvr/). This application allows to connect GoPro VR Player (http://www.kolor.com/gopro-vr-player/download/) with Reaper. The main advantages of using SpookSyncVR are:
You can find tutorial how to use SpookSyncVR under this link: https://www.youtube.com/watch?v=lzLxmEIYBl4 The only difference between Reaper session from the above tutorial and our session is that instead of ATK plug-ins, the FB Spatial Workstation plug-ins were used. You have to assign “Listener Pitch” to “pan_pitch” (OpenSoundControl parameter) and “Listener Yaw” to “pan_yaw”. “pan_pitch” and “pan_yaw” are available in “Send pan” Spook’s field. 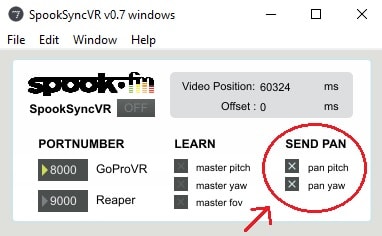 In FB360 Control turn off “Get from video”: 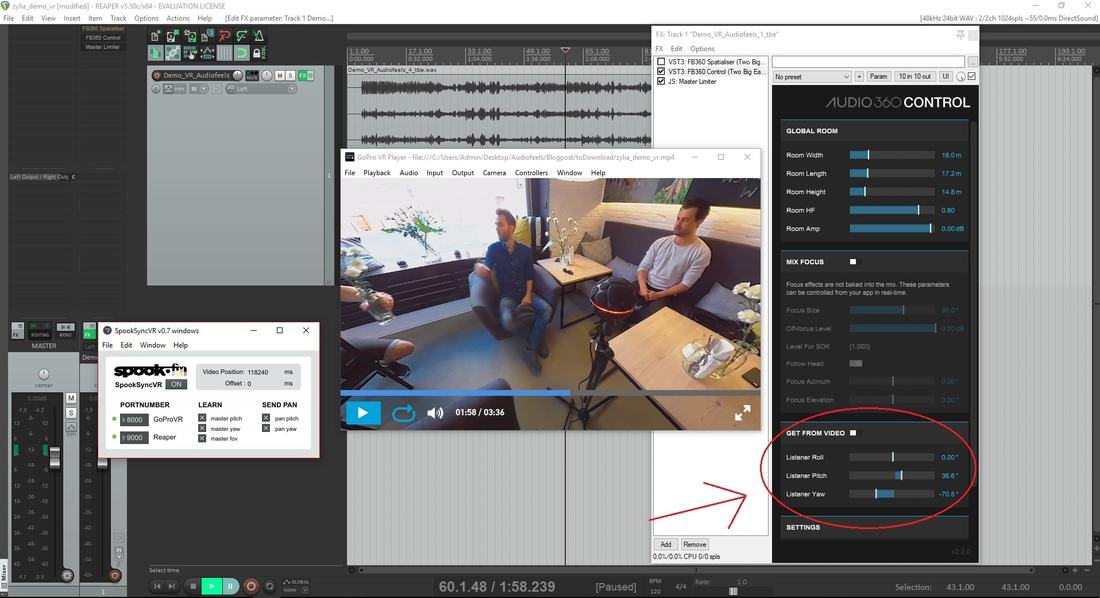 Now our 360 demo is ready to run. Enjoy it!
Source recordings cannot be published anywhere else in the original or modified form. |
Categories
All
Archives
August 2023
|
 RSS Feed
|
|
Connect with us |
|
© Zylia Sp. z o.o., copyright 2018. ALL RIGHTS RESERVED.
|